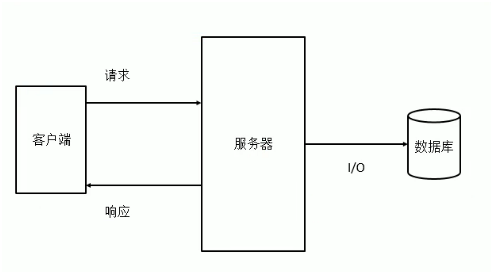
I/O 操作指的是对磁盘的读写操作
提升的方法:请求、响应(带宽)、服务器(代码质量)、I/O(磁盘读写,最大的瓶颈)
中台 用 node 写的一个服务器,比较便宜,多写几个,专门用于处理渲染,java 渲染不行
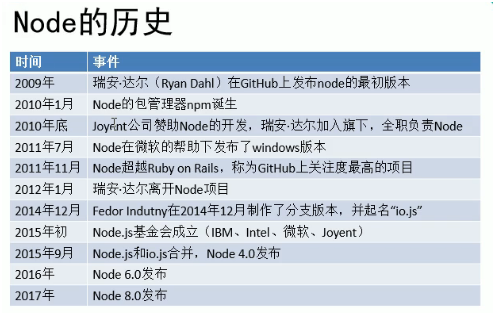
Node 是一个能够在服务器端运行 JS 的开源、跨平台的 JS runtime。Node 仅仅对 ES 标准进行了实现,所以在 Node 中不包含 DOM 和 BOM
Node 采用 V8 引擎运行 js 代码,使用事件驱动、非阻塞和异步 I/O 模型等技术来提高性能,可以优化应用程序的传输量和规模
Node 大部分基本模块都是用 JS 编写,在 Node 出现之前,JS 通常作为客户端程序设计语言使用,以 JS 写出的程序常在用户浏览器上运行
通过 Node 可以使 js 代码在服务器端执行
node 底层是使用 c++ 的编写的
node 的特点:
Node 中可以使用所有的内建对象
Node 可以在后台来编写服务器
传统的服务器都是多线程的
Node 的服务器单线程的
参数:<string> 路径或路径片段的序列。
边界
零长度的 path 片段会被忽略。
如果没有传入 path 片段,则会返回当前工作目录的绝对路径
如果传入的绝对路径不存在,则会返回当前工作目录的绝对路径
当前工作目录:node 命令执行的目录
[Running] node "/Users/pangjing02/project/init-icode/src/app.js"
[Output] /Users/pangjing02/project/init-icode
异常
描述
path 会被追加到前面,直到构造出绝对路径path 片段之后还未生成绝对路径,则会使用当前工作目录'/foo' 和 'foo',遇到这种类型的路径时就会停止对路径序列的处理'./foo' 和 '../foo',遇到这种类型的路径时会将当前路径拼接在左边的路径之后。其中 '../foo' 会将左边的路径回退一层再拼接示例
const path = require("path")

path.resolve('/目录1/目录2', './目录3');
// 返回: '/目录1/目录2/目录3'

path.resolve('/目录1/目录2', '/目录3/目录4/');
// 返回: '/目录3/目录4'

path.resolve('目录1', '目录2/目录3/', '../目录4/文件.gif');
// 如果当前工作目录是 /目录A/目录B,
// 则返回 '/目录A/目录B/目录1/目录2/目录4/文件.gif'
// ../ 跳过了目录3
webpack
__dirname 是文件自身的绝对路径,所以如果是在 config 文件夹中进行 webpack 配直,则需要退回一格才能到达根路径__dirname 是 __directory+name 的缩写,顾名思义,是目录名
const path = require("path")

path.resolve() // /Users/pangjing02/project/init-icode
__dirname // /Users/pangjing02/project/init-icode/src
__filename // /Users/pangjing02/project/init-icode/src/app.js
当前执行文件所在目录的完整目录名
包含文件在内的绝对路径
项目的根路径?
系统的根路径?
是否有方法可以设置?比如 tsc 的 baseUrl,比如 webpack 的某些配置?是否有必要设置?
路径是双向的,要么是 / 开始,要么是 ../ 回退,要么是 使用 alias
output.publicPath
deserve.contentBase
package.json 里的 webpack 配置,没有/,表示的项目根目录?
tsc 的 beseUrl,根据 tsc 自身的路径设置根路径
src/utils
// 相同于是与tsc.json同级的 ./scr/utils
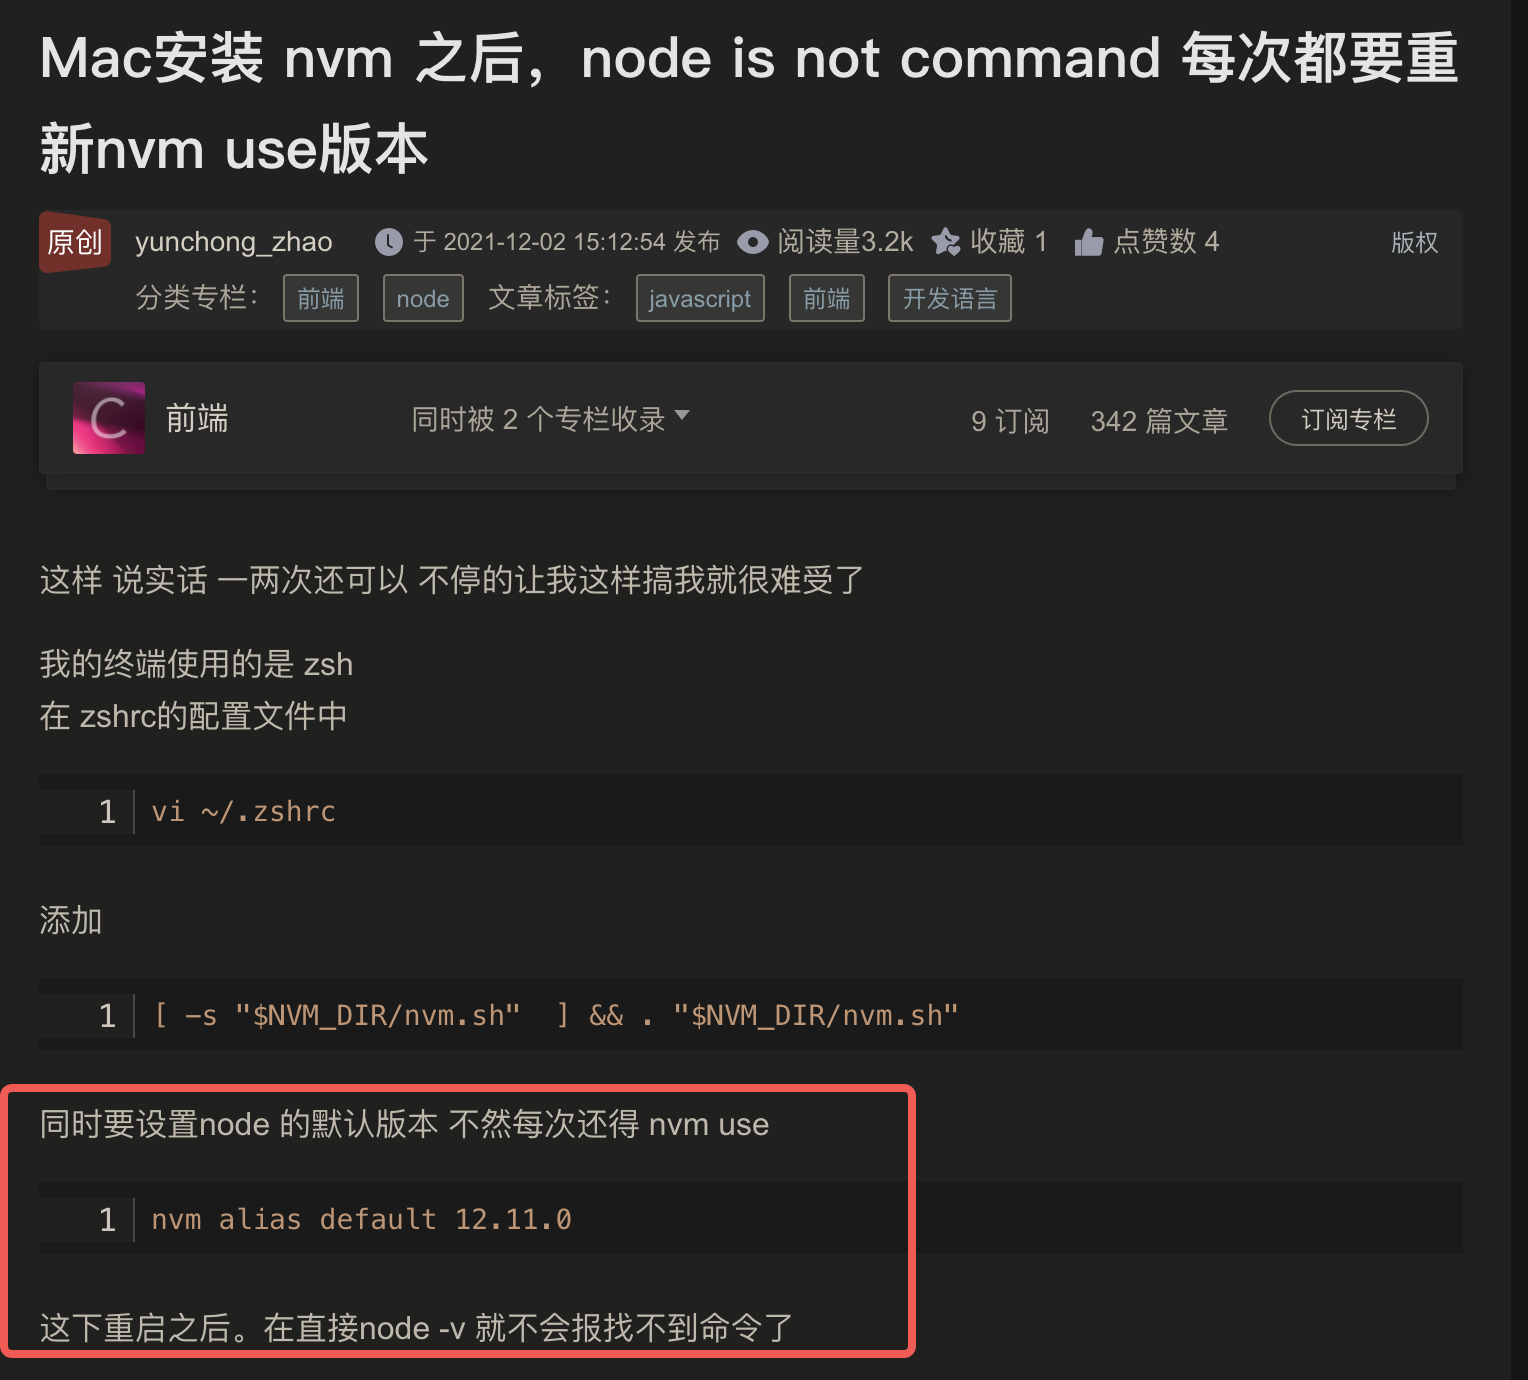
注意: 这里删除了全局的 node 环境变量, 导致 vscode 中无法自动查找到 node 命令了.
参考 github 上的最新链接
curl -o- https://raw.githubusercontent.com/nvm-sh/nvm/v0.38.0/install.sh | bash

wget -qO- https://raw.githubusercontent.com/nvm-sh/nvm/v0.38.0/install.sh | bash
在 .bash_profile 文件中加入以下代码,配置环境变量。参考下面 zsh 的设置即可
Mac 新版本安装 nvm 之后,出现 nvm command not found 的问题
Mac 安装 nvm 之后,执行 source ~/.bash_profile,当前终端可以使用 nvm,新 tab 或者退出重新打开,还是不能使用 nvm,还得再次执行 source ~/.bash_profile,才可以使用 nvm。Mac 新版本中终端是 zsh,所以使用 .bash_profile 文件之后,不会生效,需要使用 zsh 的文件才行。解决:
cd ~touch .zshrc.zshrc 文件export NVM_DIR="$HOME/.nvm"
[ -s "$NVM_DIR/nvm.sh" ] && \. "$NVM_DIR/nvm.sh" # This loads nvm
[ -s "$NVM_DIR/bash_completion" ] && \. "$NVM_DIR/bash_completion" # This loads nvm bash_completion
source ~/.zshrcnvm 命令即可nvm install stable //安装最新版
nodenvm install [node 版本号] //安装指定版本的
nodenvm use [node 版本号] //切换到指定版本的 node
nvm alias default [node 版本号] //设置默认版本
nvm 和 n 的差异还是比较大的,具体体现在:
nvm 安装起来显然是要麻烦不少;n 这种安装方式更符合 node 的惯性思维。见仁见智吧。nvm 不支持 Windows。n 对全局模块毫无作为,因此有可能在切换了 node 版本后发生全局模块执行出错的问题;
nvm 的全局模块存在于各自版本的沙箱中,切换版本后需要重新安装,不同版本间也不存在任何冲突。node 路径。n 是万年不变的 /usr/local/bin; nvm 需要手动指定路径。nvm 比起 n 更加流行,所以我也选择 nvm:https://github.com/nvm-sh/nvm
参考: https://cloud.tencent.com/developer/article/1674774
在安装 nvm 或 fnm 后,然后只要仓库根目录下有内容为 lts/hydrogen 的 .nvmrc 文件,进入这个仓库时就会自动安装或切换到正确的 Node.js 版本。
https://www.cnblogs.com/biehongli/p/12756256.html
参考:https://segmentfault.com/a/1190000017463371
是一个辅助前端开发的 包管理工具
包括:
管理对象:包(package)
管理方式:
npm 中涉及到的主体主要有两个:package 和 module,定义如下:
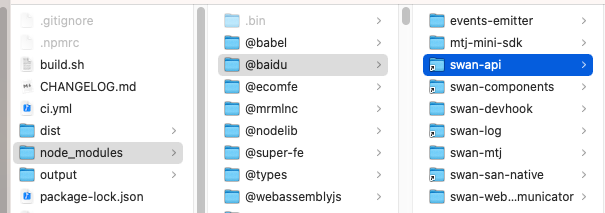
含有package.json描述文件 并 发布到npm仓库 的文件或者文件夹在node_modules中,可以 被Node.js的require()方法加载 的任何文件或文件夹可以这样理解:一个 JavaScript 软件,从本地发布到 npm 仓库时是 package,从 npm 仓库下载到本地时就变成了 module
NPM(Node Package Manager)CommonJS 包规范是理论,NPM 是其中一种实践。
对于 Node 而言,NPM 帮助其完成了第三方模块的发布、安装和依赖等。借助 NPM,Node 与第三方模块之间形成了很好的一个生态系统。
npx 其是 npm v5.2.0 引入的一条命令,它在上述命令执行时: @link
node_modules 中找 eslint 的执行文件,如果找到了,就直接执行,相当于上面所说的第一种方式;eslint ,用完之后就删除这个临时的包,对本机完全无污染。| 命令 | 功能 |
|---|---|
| npm –v | 查看版本 |
| npm version | 查看所有模块的版本 |
| npm | 帮助说明 |
| npm init | 初始化 可以直接在当前目录创建一个 package.json 文件 根据指示创建 package.json 文件 名字不能有大写字母 改为 _ |
| npm search 包名 | 搜索模块包 联网搜索 |
| npm list | 查看安装的所有的包 |
| npm root -g | 查看全局下载目录 |
| 命令 | 作用 |
|---|---|
| npm install | 下载当前项目所依赖的包 没有依赖的包是无法运行的 |
| npm install 包名 npm i 包名 |
在 当前目录 安装包 安装的时候,根据 package.json 识别,如果没有该文件,无法安装在该目录 所有从 npm 上下载的模块都会装在 node modules 目录下 从 npm 上下载包,在引入的时候不用文件路径,直接写包名即可 |
| npm install 包名 --save npm install 包名 -S |
安装包并添加到依赖中 package.json 的 dependencies 会自动添加相关的包的描述 |
| npm install 包名 –g | 全局模式安装包 全局安装的包可以直接 require,系统会根据 NODE_PATH 去寻找 根据功能而定,可以在 cmd 全局环境下使用命令 本地安装的主要意义是同个 npm 包的版本依赖问题,全局只能有一个版本 |
| npm install 包名 --save-dev npm install 包名 --D |
下载某个开发编译期依赖包 |
| npm install package@version | 下载指定版本的某个依赖包 |
| npm install 文件路径 | 从本地安装 |
| npm install 包名 -registry=地址 | 从镜像源安装 |
| npm config set registry 地址 | 设置镜像源 |
| npm remove 包名 npm r 包名 |
删除一个模块 |
| npm remove 包名 --save | 从依赖里也同时删除 |
| npm rm packageName –save-dev | 移除已下载的开发依赖包 |
npm install -g cnpm --registry=https://registry.npm.taobao.org
从淘宝安装 cnpm,以后使用 cnpm 命令即使从淘宝的镜像网站下载,使用 npm 命令则是从美国的下载
npm config set registry="https://registry.npm.taobao.org"
执行 package.json 的 scripts 中配置的命令
淘宝 npm 的镜像,因为 npm 的服务器在美国
CommonJS 的包规范允许我们将一组相关的模块组合到一起,形成一组完整的工具。
CommonJS 的包规范由包结构和包描述文件两个部分组成。
通过 npm init 创建包
通过 npm init -y 交互式的创建包
用于组织包中的各种文件
包实际上就是一个压缩文件,解压以后还原为目录。符合规范的目录,应该包含如下文件:
下载到本地的 module 主要是用于在 node 环境被引用,为了能被 Node.js 的 require() 方法加载,module 必须是下列情况之一:
npm 官方建议规范的包 至少 包含:
link and unlink
注册 npm 账号,并添加到本地 npm 设置中
npm adduser --registry=http://registry.npm.baidu-int.com
全名:chiyu-git
用户名:重要!发布scoped包时会用到
密码:***Ke
npm whoami
查看登录信息
npm i nrm -g
nrm 是 npm 仓库管理的软件,可用于 npm 仓库的快速切换
nrm 常用命令:
 nrm //展示nrm可用命令
 nrm current -u
 nrm ls //列出已经配置的所有仓库
 nrm test //测试所有仓库的响应时间
 nrm add <registry> <url> //新增仓库
 nrm use <registry> //切换仓库
nrm add baiduNpmMirror http://registry.npm.baidu-int.com
nrm use npm
npm init --scope=@chiyu-git -y
@符号后面的是你注册 npm 账户时的 username,如果不记得可以通过 npm whoami 查询
npm publish
报错:
npm ERR! publish Failed PUT 402
npm ERR! code E402
npm ERR! You must sign up for private packages : @yuyy/babel
原因:
npm publish 命令执行,默认是进行私有发布,参见 官网publish命令npm publish --access public
发布的包名可以和项目名不一致,包名取决于 package.json 中的 name 字段。
第一次发布带上这个命令就行,也可以选择在 package.json 添加上 public 字段
更新:
npm version minor
可以直接修改 package.json 的版本号,也可以使用 npm 的命令
废弃:
废弃的包除了安装时会有警示,并不影响使用
npm deprecate [email protected] 'test deprecate'
删除:
npm 不鼓励任何形式的删除,主要因为我们发布的包可能已经被其他人引用,如果我们删除了此包,其他人在重新安装含有我们包的依赖的工程时,出现找不到包问题。
基于此,npm 做了相关的删除限制:
删除的版本24小时后方可重发!只有发布72小时之内的包可以删除!撤销发布的命令为 npm unpublish
npm unpublish [email protected] --registry=http://registry.npm.baidu-int.com
**注意:**如果删除包的时候没有加上版本号,会删除全部的版本
https://juejin.cn/post/6919306081164345351
3.0.0-alpha.1
npm 重置镜像失败 -- 删除.npmrc 文件即可
npm i -g npm-upgrade
可交互的 npm 包升级工具,升级到合适的版本之后,再重新 npm i 就好了
描述包的相关信息,以供外部读取分,用于表达非代码相关的信息,
它是一个 JSON 格式的文件 – package.json,位于包的根目录下,是包的重要组成部分。
package.json 中的字段
注意:在 JSON 文件里不可以写注释
node 会先从 package.json 文件中读取所有 dependencies 信息,然后根据 dependencies 中的信息与 node_modules 中的模块进行对比,没有的直接下载。已有的就按照 package-lock.json 来
另外,package.json 文件只记录你通过 npm install 方式安装的模块信息,而这些模块所依赖的其他子模块的信息不会记录。
package-lock.json 文件锁定所有模块的版本号,包括主模块和所有依赖子模块。当你执行 npm install 的时候,node 从 package.json 文件读取模块名称,从 package-lock.json 文件中获取版本号,然后进行下载或者更新。
项目中引入的包版本号之前经常会加^号,每次在执行 npm install 之后,下载的包都会发生变化,为了系统的稳定性考虑,每次执行完 npm install 之后会创建或者更新 package-lock 文件。该文件记录了上一次安装的具体的版本号,相当于是提供了一个参考,在出现版本兼容性问题的时候,就可以参考这个文件来修改版本号即可
不过如果修改 了 package.json,且 package.json 和 lock 文件不同,那么执行 npm i 时 npm 会根据 package 中的版本号以及语义含义去下载最新的包,并更新至 lock。
具体更新规则如下: https://blog.csdn.net/weixin_43820866/article/details/105232066
版本的格式
major.minor.patch
主版本号. 次版本号. 修补版本号
————————————————————
patch:修复 bug,兼容老版本
minor:新增功能,兼容老版本
major:新的架构调整,不兼容老版本
| 版本号格式 | 描述 | 示例 |
|---|---|---|
| version | 必须匹配某个版本 | 如:1.1.2,表示必须依赖 1.1.2 版 |
| >version | 必须大于某个版本 | 如:>1.1.2,表示必须大于 1.1.2 版 |
| >=version | 可大于或等于某个版本 | 如:<1.1.2,表示必须小于 1.1.2 版本 |
| <version | 必须小于某个版本 | |
| <=version | 可以小于或等于某个版本 | |
| ~version | 大概匹配某个版本 如果 minor 版本号指定了,那么 minor 版本号不变,而 patch 版本号任意 如果 minor 和 patch 版本号未指定,那么 minor 和 patch 版本号任意 |
如:~1.1.2,表示>=1.1.2 <1.2.0,可以是 1.1.2,1.1.3,1.1.4,.....,1.1.n 如:~1.1,表示>=1.1.0 <1.2.0,可以是同上 如:~1,表示>=1.0.0 <2.0.0,可以是 1.0.0,1.0.1,1.0.2,.....,1.0.n,1.1.n,1.2.n,.....,1.n.n |
| 兼容某个版本
版本号中 最左边的非 0 数字 的右侧可以任意
如果缺少某个版本号,则这个版本号的位置可以任意 | 如:^1.1.2 ,表示>=1.1.2 <2.0.0,可以是 1.1.2,1.1.3,.....,1.1.n,1.2.n,.....,1.n.n
如:^0.0,表示>=0.0.0 <0.1.0,可以是 0.0.0,0.0.1,.....,0.0.n |
| x-range | x 的位置表示任意版本 | 如:1.2.x,表示可以 1.2.0,1.2.1,.....,1.2.n |
| *-range | 任意版本,"" 也表示任意版本 | *,表示>=0.0.0 的任意版本 |
| version1 - version2 | 大于等于 version1,小于等于 version2 | 如:1.1.2 - 1.3.1,表示包括 1.1.2 和 1.3.1 以及他们间的任意版本 |
| range1 ||range2 | 满足 range1 或者满足 range2,可以多个范围 | 如:<1.0.0 ||>=2.3.1 <2.4.5 ||>=2.5.2 <3.0.0,表示满足这 3 个范围的版本都可以 |
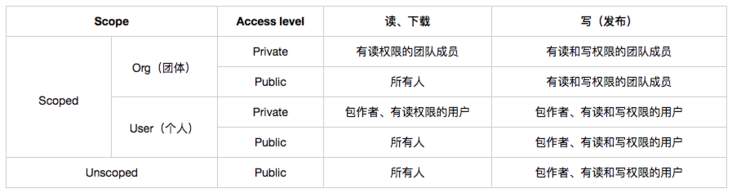
一旦注册个人或者团体账户,就获得了与个人或者团体名相匹配的 scope,可以用这个 scope 作为包的命名空间,例如@yuyy、@58。
分类:
作用:为你自己发布的包提供命名空间,防止与他人的包名冲突
package.json 的顶级属性
  "publishConfig": {
    "access": "public"
  },
属性值有:
此属性和 github 创建仓库时设定访问性的策略一致:公有,所有人可见,免费;私有,仅自己可见,收费。
以上两个属性之间的关系如下:
如果是单入口包,始终从包名导出 import from 'your-lib',可以按如下配置:
{
    // -----单入口----
    // 入口文件(使用 cjs 规范)
    "main": "lib/index.js",
    // 入口文件(使用 esm 规范)
    "module": "es/index.js",
    // 包类型导出
    "typings": "typings/index.d.ts",
    // 浏览器入口
    "browser": "dist/index.js",
    "sideEffects": false
}
参数说明:
main:cjs 格式的入口文件module:esm 格式的入口文件browser:浏览器端使用,配置成 umd 格式(webpack < 5 会优先使用 browser)sideEffects:副作用配置,主要用在 Tree Shaking 场景,设置成 false 则告诉打包工具大胆进行 Tree Shaking。
ts support of subpath exports requires newer module resolutions such as Node16 and NodeNext
{
  "compilerOptions": {
    "moduleResolution": "Node16" // or `"NodeNext"`
  }
}
exports 字段声明了一个对应关系,用 import "package" 和 import "package/sub/path" 会返回不同的模块。
这替换了默认返回 main 字段文件的行为。
当指定了 exports 字段时,只有声明了那些模块是可用的,其他的模块会抛出 ModuleNotFound Error。
  "exports": {
   ".": {
          "import": {
                "node": "./index.mjs",
                "default": "./dist/vue.runtime.esm-bundler.js"
             },
            "require": "./index.js",
            "types": "./dist/vue.d.ts"
   },
   "./server-renderer": {
            "import": "./server-renderer/index.mjs",
            "require": "./server-renderer/index.js"
   },
   "./compiler-sfc": {
            "import": "./compiler-sfc/index.mjs",
            "require": "./compiler-sfc/index.js"
   },
   "./dist/*": "./dist/*",
   "./package.json": "./package.json",
   "./macros": "./macros.d.ts",
   "./macros-global": "./macros-global.d.ts",
   "./ref-macros": "./ref-macros.d.ts"
    },
    "browser": {
        "./react": "dist/react/index.js",
        "./vue": "dist/vue/index.js"
    },
exports:Node.js 提出的模块导出提案,好处是可以定义导出的模块路径,支持不同环境(Node.js、浏览器等)下使用不同格式(esm、cjs)的包
browser 和 sideEffects 含义同上
查看全局软链:npm ls -g
https://juejin.cn/post/6844904030620090382
建立软链之后可以再 node_modules 查看是否有快捷方式 link
重新 npm i 会断开 link
未使用 lerna 之前,想要调试一个本地的 npm 模块包,需要使用 npm link 来进行调试,但是在 lerna 中可以直接进行模块的引入和调试,这种动态创建软链是如何实现的?
其实,lerna 中也是通过这种方式来实现软链的
fs.symlinkSync(target,path,type)
// target <string> | <Buffer> | <URL>
// 目标文件path <string> | <Buffer> | <URL>
// 创建软链对应的地址type <string>
fs.symlinkSync(target,path,type)
示例
const res = fs.symlinkSync('./target/a.js','./b.js');
这段代码的意思是为 创建一个软链接 b.js 指向了文件 ./targert/a.js, 当 a.js 中的内容发生变化时,b.js 文件也会发生相同的改变。
在 Node.js 文档中,fs.symlinkSync() lerna 的源码中动态链接也是通过 symlinkSync 来实现的。源码对应地址:软链实现源码地址参考 1
function createSymbolicLink(src, dest, type) {
    log.silly('createSymbolicLink', [src, dest, type]);
    return fs
        .lstat(dest)
        .then(() => fs.unlink(dest))
        .catch(() => {
            /* nothing exists at destination */
        })
        .then(() => fs.symlink(src, dest, type));
}
更多关于软链的文章, 我后面会单独写一篇文章介绍软硬链接,这里知道
lerna 链接部分的实现就可以了。Node fs 官网 参考 2
多用 lerna -h 就好
一个优秀的中文文档:http://www.febeacon.com/lerna-docs-zh-cn/routes/commands/version.html
| 命令 | 作用 |
|---|---|
| lerna init | 使用命令 lerna init 执行成功后,目录下将会生成基础的目录结构 |
lerna create <name> |
创建一个新的由 lerna 管理的包 |
| lerna bootstrap | 安装所有依赖项并连接所有的交叉依赖,相当于 link 所有的子包 |
| lerna add axios | 增加模块包到最外层的公共 node_modules 中 |
| lerna add ui-web --scope=example-web | 增加模块包到 packages 中指定项目 下面是将 ui-web 模块增加到 example-web 项目中 |
| lerna exec --scope example-web -- yarn start | 在 packages 中对应包下的执行任意命令 下面的命令,是对 packages 下的 example-web 项目执行 yarn start 命令 |
| lerna exec -- rm -rf ./node_modules | 如果命令中不增加 --scope example-web 直接使用下面的命令,这会在 packages 下所有包执行命令 rm -rf ./node_modules |
| lerna list // 等同于 lerna ls | 显示 package 下所有的安装的包,检查子包是否正常 |
| lerna list --json | 可以通过 json 的方式查看 lerna 安装了哪些包,json 中还包括包的 路径,有时候可以用于查找包是否生效。 |
| lerna clean | 从所有包中删除 node_modules 目录但不会删除项目最外层的根 node_modules |
| lerna publish | 1. 这个命令可以结合 lerna.json 中的 "version": "independent" 配置一起使用,可以完成统一发布版本号和 packages 下每个模版发布的效果2. lerna publish 永远不会发布标记为 private 的包(package.json中的”private“: true)3. 默认情况下会推送到系统目前 npm 对应的 registry 里,实际项目里可以根据配置 leran.json 切换所使用的 npm 客户端。 |
| 更多命令请查看 lerna -h |
一般来说,项目中很少直接使用 lerna create 创建,因为依赖项包括一些其他的模块目录配置比较复杂。
基本都会使用模板引擎(yeoman)或者是自己手写 script 接收入参去做一些事情。
只需要正常的 npm i,然后公共依赖可以选择 lerna add,也可以选择在根目录 npm i
最后通过 lerna bootstrap 安装全部的依赖即可
可以使用 lerna 的命令,也可以直接在 package 目录终端 npm,最终只要 package 自身的 dependence 更新了即可
如果是 peer 类型的依赖,也可以直接 install,最后手动更新 peer 字段即可
通过 nrm 确认好当前使用的 npm 源
包的构建本身是由各个 package 自己控制,lerna 只负责统一执行构建命令(如:npm run build)0 和发布命令(如:npm run publish)
深入 lerna 发包机制 —— lerna publish:https://juejin.cn/post/6946504838834290695#comment
lerna version 统一控制版本号关于 lerna version 可以看:[https://github.com/lerna/lerna/tree/main/commands/version#readme](https://github.com/lerna/lerna/tree/main/commands/version#readme
)
lerna version 提供了统一的版本控制工具,非常方便的是除了控制版本的变化,能够自动打 tag 并且合并分支,push 到远程分支。
前提:
下面执行 lerna version patch 之后,可以发现,自动更新版本号并且 push 了分支,同时有了 tag
其他版本命令同 npm
lernax 项目的根目录的 packaged.json 就不需要 version 字段标识版本号了
使用 lerna publish --message 'build: public new version' 能够同时选择版本然后执行 npm publish。
注意每个包的 package.json 中不需要写 scripts: publish ,lerna 自动完成即可
没有必要使用 lerna version,publish 可以交互式的控制版本号,然后自动打好 tag,上传到 github 上
发布 package 的名字如果是以@开头的,例如 @feu/tools,npm 默认以为是私人发布,需要使用 npm publish --access public 发布。但是 lerna publish 不支持该参数,解决方法参考: issues
// package.json
{
 "name": "@feu/tools",
 "publishConfig": {
   "access": "publish"  // 如果该模块需要发布,对于scope模块,需要设置为publish,否则需要权限验证
  }
}
你可以在你这次失败之后使用 lerna publish from-git 从上次版本迭代的结果开始发布。
在 lerna.json 设置
{
  "packages": [
    "packages/*"
  ],
  "version": "independent"
}
执行 lerna publish 命令后在会出现如下内容,针对 packages 中的每个模块单独选择版本进行发布。
如果想要发布的模块统一,使用相同的版本号,需要修改 lerna.json , 将 "version": "independent", 改为固定版本号, 修改后尝试重新使用 lerna publish 进行发布,
**注意:**这里再次声明一下,如果使用了 independent 方式进行版本控制,在 packages 内部的包进行互相依赖时,每次发布之后记得修改下发布后的版本号,否则在本地调试时会出现刚发布的代码不生效问题 (这个问题本人亲自遇到过,单独说下)
在 Node 通过 fs 模块来对系统中的文件进行操作,fs 模块是 node 中已经继承好了,不需要在使用 npm 下载,直接 引入 即可
因为 fs 模块需要对文件进行操作,会涉及到操作权限的问题,所以需要先清楚文件权限是什么,都有哪些权限。
| 权限分配 | 文件所有者 | 文件所属组 | 其他用户 |
|---|---|---|---|
| 权限项 | 读 | 写 | 执行 |
| 字符表示 | r | w | x |
| 数字表示 | 4 | 2 | 1 |
在上面表格中,我们可以看出系统中针对三种类型进行权限分配,即文件所有者(自己)、文件所属组(家人)和其他用户(陌生人),文件操作权限又分为三种,读、写和执行,数字表示为八进制数,具备权限的八进制数分别为 4 、2、1,不具备权限为 0。
使用 Linux 命令 ls -al 来查目录中文件和文件夹的权限位
drwxr-xr-x 1 PandaShen 197121 0 Jun 28 14:41 core
-rw-r--r-- 1 PandaShen 197121 293 Jun 23 17:44 index.md
在上面的目录信息当中,很容易看出用户名、创建时间和文件名等信息,但最重要的是开头第一项(十位的字符)。
第一位代表是文件还是文件夹,d 开头代表文件夹,- 开头的代表文件,而后面九位就代表当前用户、用户所属组和其他用户的权限位,按每三位划分,分别代表读(r)、写(w)和执行(x),- 代表没有当前位对应的权限。
权限参数 mode 主要针对 Linux 和 Unix 操作系统,Window 的权限默认是可读、可写、不可执行,所以权限位数字表示为 0o666,转换十进制表示为 438。
NodeJS 中,标识位代表着对文件的操作方式,如可读、可写、即可读又可写等等,在下面用一张表来表示文件操作的标识位和其对应的含义。
| 符号 | 含义 |
|---|---|
| r | 读取文件,如果文件不存在则抛出异常。 |
| r+ | 读取并写入文件,如果文件不存在则抛出异常。 |
| rs | 读取并写入文件,指示操作系统绕开本地文件系统缓存。 |
| w | 写入文件,文件不存在会被创建,存在则清空后写入。 |
| wx | 写入文件,排它方式打开。 |
| w+ | 读取并写入文件,文件不存在则创建文件,存在则清空后写入。 |
| wx+ | 和 w+ 类似,排他方式打开。 |
| a | 追加写入,文件不存在则创建文件。 |
| ax | 与 a 类似,排他方式打开。 |
| a+ | 读取并追加写入,不存在则创建。 |
| ax+ | 与 a+ 类似,排他方式打开。 |
r+ 和 w+ 的区别,当文件不存在时,r+ 不会创建文件,而会抛出异常,但 w+ 会创建文件;如果文件存在,r+ 不会自动清空文件,但 w+ 会自动把已有文件的内容清空。
操作系统会为每个打开的文件分配一个名为文件描述符的数值标识,文件操作使用这些文件描述符来识别与追踪每个特定的文件,Window 系统使用了一个不同但概念类似的机制来追踪资源,为方便用户,NodeJS 抽象了不同操作系统间的差异,为所有打开的文件分配了数值的文件描述符。
在 NodeJS 中,每操作一个文件,文件描述符是递增的,文件描述符一般从 3 开始,因为前面有 0、1、2 三个比较特殊的描述符,分别代表 process.stdin(标准输入)、process.stdout(标准输出)和 process.stderr(错误输出)。
官方支持的 fs promise 化模块
import * as fs from 'fs/promises';
The fs/promises API provides asynchronous file system methods that return promises.
The promise APIs use the underlying(底层的) Node.js threadpool to perform file system operations off the event loop thread. These operations are not synchronized or threadsafe. Care must be taken when performing multiple concurrent modifications on the same file or data corruption(腐败、特指文件损坏) may occur.
var fs = require("fs");
fs 模块中的大部分操作都提供了两种方法,同步方法和异步方法
同步方法带 sync 后缀
异步方法没有 sync,都需要回调函数
nodejs 的特色:异步调用,存在嵌套,性能优先
js 错误优先,可以先判断是否出错,对错误进行处理,而同步方法没有异常处理机制,对于服务器很致命,因为同步方法出错了,下面的代码全都不执行了,异步只是自己不执行
同步:厨师出事了,异步:服务员出事了
文件操作中的基本方法都是对文件进行整体操作,即整个文件数据直接放在内存中操作,如读取、写入、拷贝和追加,由于计算机的内存容量有限,对文件操作需要考虑性能,所以这些方法只针对操作占用内存较小的文件。
fs.readFile(path[, options], callback)
fsPromises.readFile(path[, options])
readFile 有两个主要参数:
options,默认值为 null,其中有 encoding(编码,默认为 null)和 flag(标识位,默认为 r),也可直接传入 encoding;encoding,返回的文件内容为 Buffer,如果有按照传入的编码解析。若现在有一个文件名为 1.txt,内容为 “Hello”,现在使用 readFileSync 读取。
const fs = require("fs");

let buf = fs.readFileSync("1.txt");
let data = fs.readFileSync("1.txt", "utf8");

console.log(buf); // <Buffer 48 65 6c 6c 6f>
console.log(data); // Hello
fs.writeFile(file, data[, options], callback)
fsPromises.writeFile(file, data[, options])
writeFileSync 有三个主要参数:
FileHandle ,写入文件的路径或文件描述符;options,默认值为 null,其中有:
encoding(编码,默认为 utf8)flag(标识位,默认为 w)mode(权限位,默认为 0o666)encoding。若现在有一个文件名为 2.txt,内容为 “12345”,现在使用 writeFileSync 写入。
const fs = require("fs");

fs.writeFileSync("2.txt", "Hello world");
let data = fs.readFileSync("2.txt", "utf8");

console.log(data); // Hello world
同步拷贝写入方法 copyFileSync 有两个参数,第一个参数为被拷贝的源文件路径,第二个参数为拷贝到的目标文件路径,如果目标文件不存在,则会创建并拷贝。
const fs = require("fs");

fs.copyFileSync("3.txt", "4.txt");
let data = fs.readFileSync("4.txt", "utf8");

console.log(data); // Hello world
使用 readFileSync 和 writeFileSync 可以模拟同步拷贝写入文件,使用 readFile 和 writeFile 可以模拟异步写入拷贝文件
流式读取和写入适用于一些比较大的文件
非流式必须把全部文件都存入 Buffer 再去操作,如果文件过大会占用很多内存
fs.createWriteStream(path[, options]) //可写流
    var ws = fs.creatWriteStream(“hello.txt”);
    ws.write(“字符串”); //write()方法,可以多次写入字符串
    ```

可以通过监听流的open和close事件,来监听流的打开和关闭

- ws.once(‘open’,function(){}) ;
  - 绑定一个一次性的事件,类似于jQuery的one()方法,因为open事件只会发生一次,没必要用on()方法
- ws.close();拔掉内存那头的水管,有些内容还在水管中没溜过去 //这一点表明,流失文件也是异步的,性能也不错
- ws.end();拔掉服务器这头的水管,内容在水管中,还可以流过去

fs.createReadStream(path[, options])

- 非流式读取方法,也是同样的缺陷,所以大文件还是用流式文件读取

  - 创建一个可读流

```js
var rs = fs.createReadStream(“hello.jpg”);
rs.on(“data”,function(data){
//因为读取就一步的操作,不太可能出错,所以没有err参数
ws.write(“hello.txt”,data);
})
rs.once(“close”,function(){
console.log(“可读流已经关闭”);
//可读流关闭,数据读取完毕,回调函数执行完毕,可以关闭可写流
ws.end();
})
rs.pipe(ws);
验证路径是否存在
如何在 Node.js 中判断一个文件是否存在? - 腾讯云开发者社区-腾讯云 (tencent.com)
获取文件信息
删除文件
列出文件
err:
files:是一个字符串数组,每个元素就是一个文件夹或文件的名字

fs.readdirSync(path[, options])
截断文件
建立目录
删除目录
重命名文件和目录
监视文件更改写入
方法一:结合 fs.readdirSync 和 fs.statSync 递归遍历
var fs = require('fs');
var path = require('path');

var searchRecursive = function(dir, pattern) {
  // This is where we store pattern matches of all files inside the directory
  var results = [];

  // Read contents of directory
  fs.readdirSync(dir).forEach(function (dirInner) {
    // Obtain absolute path
    dirInner = path.resolve(dir, dirInner);

    // Get stats to determine if path is a directory or a file
    var stat = fs.statSync(dirInner);

    // If path is a directory, scan it and combine results
    if (stat.isDirectory()) {
      results = results.concat(searchRecursive(dirInner, pattern));
    }

    // If path is a file and ends with pattern then push it onto results
    if (stat.isFile() && dirInner.endsWith(pattern)) {
      results.push(dirInner);
    }
  });

  return results;
};

var files = searchRecursive('./', '.html'); // replace dir and pattern
                                                // as you seem fit

console.log(files);
方法二:child_process 使用 find 和 dir,并且不递归搜索,但具有相对路径
var exec = require('child_process').exec;
function findFiles(folder,extension,cb){
    var command = "";
    if(/^win/.test(process.platform)){
        command = "dir /B "+folder+"\\*."+extension;
    }else{
        command = "ls -1 "+folder+"/*."+extension;
    }
    exec(command,function(err,stdout,stderr){
        if(err)
            return cb(err,null);
        //get rid of \r from windows
        stdout = stdout.replace(/\r/g,"");
        var files = stdout.split("\n");
        //remove last entry because it is empty
        files.splice(-1,1);
        cb(err,files);
    });
}

findFiles("folderName","html",function(err,files){
    console.log("files:",files);
})
更多:https://www.itranslater.com/qa/details/2582261039354086400
更多:https://cn.starbytecomputers.com/how-list-all-files
Buffer 和数组的结构的非常类似,Buffer 是用来存储二进制数据的
数组中无法存储二进制文件:图片、视频、音频等,这些与后台交换数据时时经常出现的,所以需要 Buffer
简单来理解,Buffer 就是一个专门存储二进制文件的数组,但是性能更好
从结构上看 Buffer 非常像一个数组,它的元素为 16 进制的两位数。

实际上一个元素就表示内存中的 一个字节, 每个元素的大小范围:00-ff(00000000-11111111),超过 255 的数字会只取后 8 位
- buf[0] = 256; //00
- buf[1] = 556; //2c  10**00101100** **00101100** 2c
实际上 Buffer 中的内存不是通过 JavaScript 分配的,而是在底层通过 C++ 申请的,也就是我们可以直接通过 Buffer 来创建内存中的空间。
Buffer 是 NodeJS 的内建对象,直接使用即可
将一个字符串中内容保存到一个 buffer 中
var buf = Buffer.from(“Hello Atguigu”);

对应的 utf-8 编码
buf.length //占用内存的大小
str.length //字符串的长度
console.log(buf[0]); // 170child_process.exec(command[, options][, callback])可以在 node 脚本中执行命令行的指令
const { execSync } = require('child_process');

// 1.先拷贝一份百度小程序到 swan-naview 文件夹中
execSync(`cp -r swan ${HOST}`);
详见:http://nodejs.cn/api/child_process.html#child_process_child_process_execsync_command_options
PM2 是常用的 node 进程管理工具,它可以提供 node.js 应用管理,如自动重载、性能监控、负载均衡等。同类工具有 Supervisor、Forever 等。
npm i pm2 -g
pm2 -v
| 命令 | 作用 |
|---|---|
| pm2 start app.js | 启动应用,定义了 app_name |
| pm2 start <app_name> | 重新启动被停止的进程 |
| pm2 reload <app_name> | |
| pm2 restart <app_name> | |
| pm2 stop <app_name> | |
| pm2 delete <app_name> | |
| pm2 [list|ls|status] | 查看管理应用列表 |
| pm2 logs | |
| pm2 monit | 基于命令行仪表盘 |
使用 js 文件
module.exports = {
    apps: [{
        name: "simple-server",
        script: "./app.js",
        watch: true,
        env: {
            "NODE_ENV": "development",
        },
        env_production: {
            "NODE_ENV": "production"
        }
    }, {
        name: "simple-server-cluster",
        script: "./app.js",
        instances: 2,
        exec_mode: "cluster"
    }]
}
使用 json 文件
{
    "apps": [
        {
            "name": "pm2-demo",
            "script": "./app.js",
            "watch": true,
            "env": {
                "NODE_ENV": "development"
            },
            "env_production": {
                "NODE_ENV": "production"
            }
        },
        {
            "name": "pm2-demo-cluster",
            "script": "./app.js",
            "instances": 2,
            "exec_mode": "cluster"
        }
    ]
}
基于 yaml 文件
watch:PM2 不止监听 server.js 文件,还监听了它引用的所有模块,只要任意模块代码进行了保存,如键盘按下 ctrl + s,或新建文件,PM2 就会进行重启。
VSCode 具有一个名为“Attach”的调试选项,该选项可让您连接到正在运行的 Node.js 程序,示例配置为
{
  "type": "node",
  "request": "attach",
  "name": "Attach",
  "port": 9229
}
在 launch.json 配置完成后, 接下来我们需要启动一个命令:
pm2 start server/index.js --node-args="--inspect-brk" --watch
这样就可以进行调试了.
其次, 如果想传递一些参数, 如 环境变量, 那么可以借助 cross-env 工具, 示例如下:
npx cross-env NODE_ENV=production pm2 start server/index.js --node-args="--inspect-brk" --watch
这个如果有 github 账号的话,可以直接授权登陆。
不管哪种方式,有账号登陆 bit.env 就行
bit 只能创建一个私人 scope
https://harmony-docs.bit.dev/getting-started/installing-bit/
npm i -g @teambit/bvm
Install Bit using BVM
bvm install
bit new react <my-workspace-name>
cd <my-workspace-name>
bit install
Initialize a Bit Harmony workspace and then manually configure the environment and install any peer dependencies needed.
bit init --harmony
Bit 会在初始化 workspace 的时候创建以下文件:
workspace.jsonc - worksapce 的配置文件,为 worksapce 下的所有组件设置规则和策略.bitmap - An auto-generated mapping between tracked components in the workspace and their physical location on the file system. The file-structure of your workspace is entirely up to you..git/bit (hidden directory) - Your local scope. Where your workspace's component release versions are stored.Install React and React Dom as peer dependencies:
"teambit.workspace/variants": {
  "*": {
    "teambit.react/react": { }
  }
}
bit install react --type peer
bit install react-dom --type peer
Both the workspace.jsonc and the .bitmap should be committed to git. The .git/bit folder will be automatically ignored by git.
workspace.jsonc file with the name of your scopeScope is a virtual storage for components. Bit uses Scopes to save versions of Bit Components and access them as needed. Set Remote scopes on Bit.dev or self-hosted Bit servers to share components.
Once you have setup a remote scope you may need to configure the workspace.jsonc to reflect the correct username and scope.
workspace.jsonc file requires a restart of the local dev-server. We can stop our server using (Ctl/cmd + c) and run it again using the start command.初始化了一个 bit 工作区之后,可以通过 bit create 命令创建组件。也可以通过 bit add 命令添加既存的组件
Use bit create to create an example button component with the namespace of ui. This will also create a package in your workspace node_modules directory and add your component to the workspace UI. It will also add your component to the bitmap file.
bit create react-component ui/button
is the same as using the --namespace flag:
bit create react-component button --namespace ui
your component will be created at the location specified and using the env that has been set in your workspace.jsonc.
Our component contains a spec.tsx file that includes a dependency for Testing Library. If you don't already have this library installed you can install dependencies using bit install:
bit install @testing-library/react
Create multiple components by adding more component names after the command.
bit create react-component ui/component1 ui/component2 design/component1
To see a list of component templates available:
bit templates
If you would like to create your own component template generator then check out our guide in Extending Bit
bit remove -h
Each component in a Bit workspace must have all its implementation files under the same directory. A component must have an entry file (index.[ts|js] is used as the default.
my-component
├── index.ts
├── my-component.compositions.tsx
├── my-component.docs.md
└── my-component.ts
To add your component to the workspace run the bit add command followed by the namespace. The namespace is the component folder structure you would like to see in your workspace.
bit add button --namespace ui
For recommendations on how to add pre-existing components see our pre-existing components guide
To track multiple components, set the path to the common directory and use the * wildcard.
bit add path/to/common/path/*
Namespaces serve as folders that organize components in the Workspace or inside a scope on bit.dev. You can use namespaces inside a scope to group related components.
To namespace a component use the --namespace or -n option.
Specifying a namespace helps you organize your components and lets you perform actions on multiple components at once. Namespaces are also useful in specifying overriding rules for all components under a specific namespace.
Components are created in a directory using the name configured in your defaultScope in your workspace.jsonc. The defaultScope should be configured as your username.scope-name and cannot contain a /. If you would like to change the default behavior of where you components are created you should use the --path flag.
bit create react-component ui/button --path bit/components
We don't recommend creating Bit components in your apps src/components folder. You should build components as if they were external modules, as if your components were in a different app.
After adding a component the .bitmap file will be regenerated to show the added component. For now the scope and version will be empty. Below is an example of button component created with the ui namespace.
{
  "ui/button": {
    "scope": "",
    "version": "",
    "mainFile": "index.ts",
    "rootDir": "my-scope/ui/button"
  },
  "version": "1.0.39"
}
Components are created under the default scope name which in this case is
my-scope. You can configure the default scope name in theworkspace.jsoncfile.
Use the bit show command followed by your ComponentID to see all details about the component including the env, the files and the dependencies.
通过 bit show <componentId> 可以查看组件的相关信息
组件互相依赖的时候该怎么引用呢? 相对路径? @scope?
考虑了一下直接使用相对路径会合适一点。使用 scope 的话相当于是要依赖项目自身的 npm install 了
然后提示我需要换成@scope 形式并安装
在 bitmap 里改?
本地组件更新后使用 bit link 刷新 npm 包
The start command starts our dev server, and watches for changes using Hot Module Replacement. It runs different workspace tasks through workers, such as testing, linters and any workspace tasks that are defined by the component.
bit start 可以开启 bit 的 dev server,会监控所有组件的改动并且通过 hot module replacement 进行更新。它通过 workers 处理工作区的各种任务,如 test、linter、以及其他由组件定义的任务
If you created or added a new component, you will need to compile before running the server. If you are following along this guide, you should run
bit compileto compile your newly created components.
bit compile
bit start
This will open-up your browser on localhost:3000, or any other available port, and display your workspace with your components.
See an overview of your component complete with a live playground. Documentation of our component is created from the *.docs.mdx file.
Learn more about Component Documenting.
Compositions show you how your component is composed. Compositions are created from the button.compositions.tsx file.
Learn more about Component Compositions.
See passing or failing tests. Tests are created from the button.spec.tsx file.
Shows any dependencies that your component has.
See all the code files your component has and inspect them as well as a list of your component's dependencies and dev dependencies.
You can compose components together from other components in your workspace or from components in the cloud.
可以在本地或者 bit cloud 上组合组件
When importing a component into another component Bit doesn't allow for relative require/import statements, as this couples your component to a specific directory structure, instead you use the component's package name. In the workspace UI you will see the package name for your component which you can copy to import it.
当一个 bit 组件引入另外一个 bit 组件时,无法使用相对路径的 require、import 语句。可以使用 component package name 引入,package name 可以在 dev server 上查看并复制,${scope}/${name} @bit-scope/weekly
import React from 'react'
import { Button } from '@my-scope/ui.button'

export interface CardProps extends React.HTMLAttributes<HTMLDivElement> {}

export const Card = ({ children, ...rest }: CardProps) => {
  return (
    <div {...rest}>
      <Button>Click here</Button>
    </div>
  )
}
In your workspace UI you will now see your card component rendered with the button component inside it.
Bit 为工作区内的每个组件创建了一个 module,这些 module 会被 link 到 node_modules,bit 会为这些模块创建一个 package.json,并在项目打包的时候输出正确的产物。
To see this in your workspace, browse the node_modules/@my-scope/ui.button directory.
To import a component as a dependency you must use the module link. This way your component is not coupled to a specific directory structure in the workspace, which makes them transferable between workspaces.
coupled 耦合、结合?
Once you have created your remote scope and configured your defaultScope you can then export your components to the remote scope so they can be published and installed in other Bit workspaces or in other web projects.
https://bit.dev/chiyu-bit/canon/root
Before exporting our components we need to tag them using the bit tag command. This will create a new version of your component.
在发布我们的 component 组件,我们需要通过 bit tag 标记他们。这会我们的组件创建一个新的版本
You can tag each individual component
bit tag button --patch --message "first version"
Or you can tag all components that have been modified
bit tag --all --message "first version"
When component has finished tagging you should see the following message:
new components
(first version for components)
     > ui/[email protected]
Once you have tagged your component you can then run the bit export command.
bit export
When your component has finished exporting you should see the following message:
exported the following 1 component(s):
your-username.demo-scope/ui/button
In your workspace go to https://bit.dev/<user-name>/<scope-name> to see your exported components.
Once the exporting process completes, the .bitmap file gets updated to reflect that new state. Make sure to track it with git.
git commit -am "updated .bitmap file after a successful export"
Once you have exported your component you can install it in another Bit workspace or in any other web project.
Component packages are installed using their package name. The package name usually correlates to the component ID.
In your component workspace click on the Use dropdown, select the Install tab to copy your component scope name and component ID. You can then choose between NPM or Yarn to install your component in to another Bit workspace or into a React application.
npm install @orgName/componentScopeName.componentID
npm install -D @chiyu-bit/canon.weekly
To install components with npm or yarn you might need to configure @YourUserName as a scoped registry.
npm config set '@chiyu-bit:registry' https://node.bit.dev
Bit Components are self contained, and have all their past versions, code and configurations as part of them. This allows for a unique feature where a consuming project may vendor a component to their Bit Workspace and manage the component as if it was authored in their workspace.
This feature is only available for workspaces with Bit initialized.
Use the import command to vendor a component.
bit import learn-harmony.hooks/use-counter
Import many components with glob-pattern
bit import teambit.mdx/*
When importing components Bit will:
defaultDirectory as defined in workspace.jsonc..bitmap.as well, All imported components are visible on the local Dev Server (bit start).
To get the latest versions of every imported component in our workspace run:
bit import
原生 component 的拥有者也是这样更新吗? 比如我 client import 之后又修改了,export 了新版本,server 该如何更新到最新版本
To turn a vendor component to a dependency use the eject command.
bit eject learn-harmony.hooks/use-counter
bit remove -h
所有使用到 bit component 的项目都在自己的项目文件夹下维护一份 bit component,分布式复用,每个项目都可以去修改整个 bit component,而不是单独抽出来一份放到上级目录
就像每个人本地都有一个 git 项目一样
bit 组织上像 git,用起来像 npm
server/client 修改 bit component,然后 bit compile,因为读取的是 node_modules/dist
推送到远程之后,另一个仓库同步:
Zero API Data Layer
后端的数据结构只有给前端的 dto 是前端可以复用的。而前端还是需要自己把 dto 转成供组件使用的 props。在复杂的业务场景下这个是没有办法避免的。当然如果只是做作表单 crud 的前后端,怎么搞都无所谓
前后端分离的主要目的是后端对多客户端的支持
https://github.com/blitz-js/blitz/discussions/3083
https://zhuanlan.zhihu.com/p/166262455
https://zhuanlan.zhihu.com/p/357883140
https://midwayjs.org/docs/hooks/intro
https://github.com/blitz-js/blitz/discussions/3083
https://www.ruanyifeng.com/blog/2015/02/make.html
CDP 基于 WebSocket,利用 WebSocket 实现与浏览器内核的快速数据通道
CDP 分为多个域(DOM,Debugger,Network,Profiler,Console...),每个域中都定义了相关的命令和事件(Commands and Events)
我们可以基于 CDP 封装一些工具对 Chrome 浏览器进行调试及分析,比如我们常用的 “Chrome 开发者工具” 就是基于 CDP 实现的
如果你以 remote-debugging-port 参数启动 Chrome,那么就可以看到所有 Tab 页面的开发者调试前端页面,还会在同一端口上还提供了 http 服务,主要提供以下几个接口:
GET /json/version                     # 获取浏览器的一些元信息
GET /json or /json/list               # 当前浏览器上打开的一些页面信息
GET /json/protocol                    # 获取当前 CDP 的协议信息
GET /json/new?{url}                   # 开启一共新的 Tab 页面
GET /json/activate/{targetId}         # 激活某个页面成为当前显示的页面
GET /json/close/{targetId}            # 关闭某个页面
GET /devtools/inspector.html          # 打开当前页面的开发者调试工具
WebSocket /devtools/page/{targetId}   # 获取某个页面的 websocket 地址
很多有用的工具都是基于 CDP 实现的,比如 Chrome 开发者工具,chrome-remote-interface,Puppeteer 等
进一步阅读:https://zhuanlan.zhihu.com/p/414915356
kraken 通过 CDP 实现了 fultter 调试
普通的静态网页不需要用浏览器渲染,直接伪装好请求头开爬就是了,superagent 加 cheerio 搭配
但有时我们还会遇到一些需要**“动态加载”**才能显示相应内容的网页——也就是说,我们需要爬的网络元素并不会直接出现在 HTML 节点里,而是必须通过 AJAX 等技术与网站后台服务器交换数据之后才能显示出来。
例如新浪网“社会新闻心情排行榜”里面的新闻标题链接(对应于图中的 <a href=…> 里面的“data[i].url”),就是一种需要通过 JavaScript 访问后台数据之后才能加载出来的动态元素。
面对这样的动态网页,我们就需要借助 PhantomJS 等无头浏览器(图中的红圈),从而模拟人类“打开浏览器、进入网址、等待加载动态网络元素”等一系列动作,然后就可以根据此时的 HTML 节点来爬数据啦。
无头浏览器是指可以在图形界面情况下运行的浏览器。我可以通过编程来控制无头浏览器自动执行各种任务,比如做 测试,给网页 截屏 等。
“无头”这个词来源于最初的“无头计算机 (Headless computer)”。维基百科关于的“无头计算机”词条:
无头系统(headless system)是指已配置为无须显示器(即“头”)、键盘和鼠标操作的计算机系统或设备。无头系统通常通过网络连接控制,但也有部分无头系统的设备需要通过 RS-232 串行连接进行设备的管理。服务器通常采用无头模式以降低运作成本。
alias chrome="/Applications/Google\ Chrome.app/Contents/MacOS/Google\ Chrome"  # Mac OS X 命令别名
chrome --headless --remote-debugging-port=9222 --disable-gpu                   # 开启远程调试
chrome --headless --disable-gpu --dump-dom https://www.baidu.com               # 获取页面 DOM
chrome --headless --disable-gpu --screenshot https://www.baidu.com
chrome 启动时可以加一些什么参数,大家可以点击 这里 查看
参考:https://imweb.io/topic/5d230c6df7b5692b080f2668
// 爬虫test
const superagent = require('superagent')
const cheerio = require('cheerio')
// const url = 'https://accounts.pixiv.net/login'
const url = 'https://segmentfault.com'
// const url = 'https://www.baidu.com'
superagent.get(url).end(function (err, res) {
  // 抛错拦截
  if (err) {
    throw Error(err)
  }
  console.log(res)
})

superagent.get(url)
  .then(function (data) {
    // 返回的就是json
    const count = data.body.body.illustManga.total
    console.log(count)
  })
类似 jQuery 的语法,但是还是有挺多不同的.html( [htmlString] )
中文文档:https://github.com/cheeriojs/cheerio/wiki/Chinese-README
返回值是一个数组,即是匹配项只有一个
遍历一个 cheerio 对象,降低通过选择器匹配的元素,或传递函数的测试的选择器元素组。当一个 cheerio 的选择是特定的,只返回元素的选择。当指定元素时,返回该元素(如果它包含在原始选择中)。如果使用该函数方法,该函数将在选定的元素的环境中执行,所以 this 是指当前元素。
Selector:
$('li').filter('.orange').attr('class');
//=> orange
Function:
$('li').filter(function(i, el) {
  // this === el
  return $(this).attr('class') === 'orange';
}).attr('class')
//=> orange
获取第一个选中元素的 HTML 内容字符串。如果 htmlstring 被指定,那么选中元素的内容被新内容所取代。
$('.orange').html()
//=> Orange

$('#fruits').html('<li class="mango">Mango</li>').html()
//=> <li class="mango">Mango</li>
获取元素集合中的每个元素的合并文本内容,包括它们的后代。如果 textString 指定文本字符串,每个元素的内容被新的内容替换。
$('.orange').text()
//=> Orange

$('ul').text()
//=>  Apple
//    Orange
//    Pear
参考:https://zhuanlan.zhihu.com/p/76237595
官方称:“Most things that you can do manually in the browser can be done using Puppeteer”,那么具体可以做些什么呢?
Puppeteer 中的 API 分层结构基本和浏览器保持一致,下面对常使用到的几个类介绍一下:
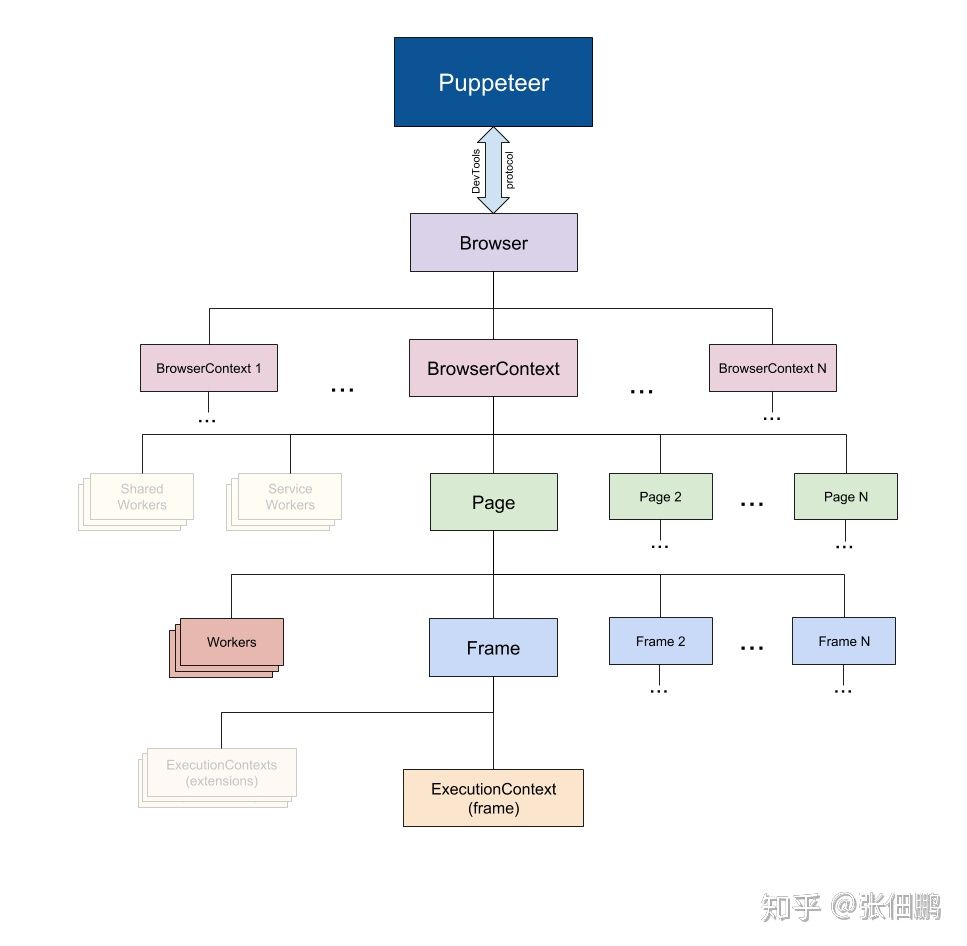
参考:https://juejin.im/post/5c3d8956e51d4511dc72c200
参考 2:https://zhuanlan.zhihu.com/p/453370934
Node 中的 Event Loop 是基于 libuv 实现的,而 libuv 是 Node 的新跨平台抽象层,libuv 使用异步,事件驱动的编程方式,核心是提供 i/o 的事件循环和异步回调。libuv 的 API 包含有时间,非阻塞的网络,异步文件操作,子进程等等。 Event Loop 就是在 libuv 中实现的。
   ┌───────────────────────────┐
┌─>│           timers          │
│  └─────────────┬─────────────┘
│  ┌─────────────┴─────────────┐
│  │     pending callbacks     │
│  └─────────────┬─────────────┘
│  ┌─────────────┴─────────────┐
│  │       idle, prepare       │
│  └─────────────┬─────────────┘      ┌───────────────┐
│  ┌─────────────┴─────────────┐      │   incoming:   │
│  │           poll            │<─────┤  connections, │
│  └─────────────┬─────────────┘      │   data, etc.  │
│  ┌─────────────┴─────────────┐      └───────────────┘
│  │           check           │
│  └─────────────┬─────────────┘
│  ┌─────────────┴─────────────┐
└──┤      close callbacks      │
   └───────────────────────────┘
Node 的 Event loop 一共分为 6 个阶段,每个细节具体如下:
timers: 执行 setTimeout 和 setInterval 中到期的 callback。pending callback: 上一轮循环中少数的 callback 会放在这一阶段执行。idle, prepare: 仅在内部使用。poll: 最重要的阶段,执行 pending callback,在适当的情况下回阻塞在这个阶段。check: 执行 setImmediate(setImmediate() 是将事件插入到事件队列尾部。主线程和事件队列的函数执行完成之后立即执行 setImmediate 指定的回调函数) 的 callback。close callbacks: 执行 close 事件的 callback,例如 socket.on('close'[,fn]) 或者 http.server.on('close, fn)。执行 setTimeout 和 setInterval 中到期的 callback,执行这两者回调需要设置一个毫秒数,理论上来说,应该是时间一到就立即执行 callback 回调,但是由于 system 的调度可能会延时,达不到预期时间。
以下是官网文档解释的例子:
const fs = require('fs');

function someAsyncOperation(callback) {
  // Assume this takes 95ms to complete
  fs.readFile('/path/to/file', callback);
}

const timeoutScheduled = Date.now();

setTimeout(() => {
  const delay = Date.now() - timeoutScheduled;

  console.log(`${delay}ms have passed since I was scheduled`);
}, 100);


// do someAsyncOperation which takes 95 ms to complete
someAsyncOperation(() => {
  const startCallback = Date.now();

  // do something that will take 10ms...
  while (Date.now() - startCallback < 10) {
    // do nothing
  }
});
当进入事件循环时,它有一个空队列(fs.readFile() 尚未完成),因此定时器将等待剩余毫秒数,当到达 95ms 时,fs.readFile() 完成读取文件并且其完成需要 10 毫秒的回调被添加到轮询队列并执行。
当回调结束时,队列中不再有回调,因此事件循环将看到已达到最快定时器的 阈值,然后回到 timers 阶段 以执行定时器的回调。
在此示例中,您将看到正在调度的计时器与正在执行的回调之间的总延迟将为 105 毫秒。
此阶段执行某些系统操作(例如 TCP 错误类型)的回调。 例如,如果 TCP socket ECONNREFUSED 在尝试 connect 时 receives,则某些 * nix 系统希望等待报告错误。 这将在 pending callbacks 阶段执行。
该 poll 阶段有两个主要功能:
I/O 回调。当事件循环进入 poll 阶段并且在 timers 中没有可以执行定时器时,将发生以下两种情况之一
poll 队列不为空,则事件循环将遍历其同步执行它们的 callback 队列,直到队列为空,或者达到 system-dependent(系统相关限制)。setImmediate() 回调需要执行,则会立即停止执行 poll 阶段并进入执行 check 阶段以执行回调。setImmediate() 回到需要执行,poll 阶段将等待 callback 被添加到队列中,然后立即执行。当然设定了 timer 的话且 poll 队列为空,则会判断是否有 timer 超时,如果有的话会回到 timer 阶段执行回调。
此阶段允许人员在 poll 阶段完成后立即执行回调。
如果 poll 阶段闲置并且 script 已排队 setImmediate(),则事件循环到达 check 阶段执行而不是继续等待。
setImmediate() 实际上是一个特殊的计时器,它在事件循环的一个单独阶段运行。它使用 libuv API 来调度在 poll 阶段完成后执行的回调。
通常,当代码被执行时,事件循环最终将达到 poll 阶段,它将 等待 传入连接,请求等。
但是,如果已经调度了回调 setImmediate(),并且轮询阶段变为空闲,则它将结束并且到达 check 阶段,而不是等待 poll 事件。
setImmediate 和 setTimeout() 是相似的,但根据它们被调用的时间以不同的方式表现。
setImmediate() 设计用于在当前 poll 阶段完成后 check 阶段执行脚本 。setTimeout() 安排在经过最小(ms)后运行的脚本,在 timers 阶段执行。setTimeout(() => {
console.log('timeout');
}, 0);
setImmediate(() => {
console.log('immediate');
});
执行定时器的顺序将根据调用它们的上下文而有所不同。
如果从主模块中调用两者,那么时间将受到进程性能的限制,其结果也不一致
如果在 I / O 周期内移动两个调用,则始终首先执行立即回调:
const fs = require('fs');
fs.readFile(__filename, () => {
setTimeout(() => {
  console.log('timeout');
}, 0);

setImmediate(() => {
  console.log('immediate');
});
});
其结果可以确定一定是 immediate => timeout。
主要原因是在 I/O阶段 读取文件后,事件循环会先进入 poll 阶段,发现有 setImmediate 需要执行,会立即进入 check 阶段执行 setImmediate 的回调。
然后再进入 timers 阶段,执行 setTimeout,打印 timeout。
process.nextTick() 虽然它是异步 API 的一部分,但未在图中显示。这是因为 process.nextTick() 从技术上讲,它不是事件循环的一部分。
process.nextTick() 方法将 callback 添加到 next tick 队列。 一旦当前 事件轮询队列 的任务全部完成,在 next tick 队列中的所有 callbacks 会被依次调用。**换种理解方式:**当每个阶段完成后,如果存在 nextTick 队列,就会清空队列中的所有回调函数,并且优先于其他 microtask 执行。
let bar;

setTimeout(() => {
  console.log('setTimeout');
}, 0)

setImmediate(() => {
  console.log('setImmediate');
})
function someAsyncApiCall(callback) {
  process.nextTick(callback);
}

someAsyncApiCall(() => {
  console.log('bar', bar); // 1
});

bar = 1;
在 NodeV10 中上述代码执行可能有两种答案,一种为:
bar 1
setTimeout
setImmediate

bar 1
setImmediate
setTimeout
无论哪种,始终都是先执行 process.nextTick(callback),打印 bar 1。