prose-mirror-schema
Introduction
Unlike many other editors, Tiptap is based on a schema that defines how your content is structured. That enables you to define the kind of nodes that may occur in the document, its attributes and the way they can be nested.
This schema is very strict. You can’t use any HTML element or attribute that is not defined in your schema.
Let me give you one example: If you paste something like This is <strong>important</strong> into Tiptap, but don’t have any extension that handles strong tags, you’ll only see This is important – without the strong tags.
与常见的富文本编辑器不同, tiptap 是基于 schema 的, 通过 schema 来定义如何组织富文本. 通过 schema 来决定哪些节点可以出现在文档中, 以及这些节点的 attributes 和 嵌套方式.
tiptap 是基于 proseMirror 开发的, schema 本质上是 proseMirror 的节点的组织方式
schema 是非常严格的, 没有事先在 schema 中定义的 html 结构将会无法使用
示例: 假如我们复制了一段 html 文本到 tiptap 中: This is <strong>important</strong>. 但是我们如果没有处理 strong 标签的 extension , 那么我们只会看到 This is important, strong tag 会被剔除
这也是为什么爱速搭的图片无法直接复制到 tiptap 中
why we need schema to strict structure?
回顾一下 RTE 的调研或许会有一些思路, 再慢慢处理吧
保证数据迁移的编辑体验, 如果允许随意输入 html, 很可能会遇到匪夷所思的编辑问题, 该节点是否可以删除, 是否可以选中, 是否可以应用粗体, 斜体等样式, 要如何处理撤销和恢复撤销都会很困难. 像 UEditor 等编辑器遇到一个问题, 对于通过 api 上传的 html 进行二次编辑会很困难.
通过 parseHTML 和 renderHTML 可以保证数据的整洁, 爱速搭复制来的图片, 也会被转换成 tiptap 适用的格式储存
担心 schema 变动带来的影响, 今天是 p>img 以后如果想要变成其他可能就得考虑兼容性了, 从这一点来看的话, node-view 都用特殊的 tag 会比较好
How A Schema Looks Like
Let’s look at the most simple schema for a typical ProseMirror editor:
以下是一个典型的 proseMirror 编辑器最基础的 schema
// the underlying ProseMirror schema
{
  nodes: {
    document: {
      content: 'block+',
    },
    paragraph: {
      content: 'inline*',
      group: 'block',
      parseDOM: [{ tag: 'p' }],
      toDOM: () => ['p', 0],
    },
    text: {
      group: 'inline',
    },
  },
}
We register three nodes here. doc, paragraph and text.
doc is the root node which allows one or more block nodes as children (content: 'block+').
Since paragraph is in the group of block nodes (group: 'block') our document can only contain paragraphs.
Our paragraphs allow zero or more inline nodes as children (content: 'inline*') so there can only be text in it.
parseDOM defines how a node can be parsed from pasted HTML. toDOM defines how it will be rendered in the DOM.
In Tiptap every node, mark and extension is living in its own file. This allows us to split the logic. Under the hood the whole schema will be merged together:
我们注册了三种节点: doc, paragraph and text.
doc 是根节点, 它允许一个或者多个块级节点作为它的子孙 (content: 'block+').
在这个基础的配置中, 我们只能在 doc 中嵌入 paragraph 节点, 因为只有 paragraph 定义了 (group: 'block')
P 节点允许嵌套 0 个或者多个行内级元素 (content: 'inline*'), 目前的 schema 中, 即是只能允许嵌套 text 元素
In Tiptap every node, mark and extension is living in its own file. This allows us to split the logic. Under the hood the whole schema will be merged together:
在 tiptap 中, 每个 node, mark, extension 都维护在单独的文件中, 这可以让我们更好的解藕逻辑. 最终, 所有 extension 定义的 schema 会被合并
// the Tiptap schema API
import { Node } from '@tiptap/core'

const Document = Node.create({
  name: 'doc',
  topNode: true,
  content: 'block+',
})

const Paragraph = Node.create({
  name: 'paragraph',
  group: 'block',
  content: 'inline*',
  parseHTML() {
    return [
      { tag: 'p' },
    ]
  },
  renderHTML({ HTMLAttributes }) {
    return ['p', HTMLAttributes, 0]
  },
})

const Text = Node.create({
  name: 'text',
  group: 'inline',
})
Nodes And Marks
Nodes are like blocks of content, for example paragraphs, headings, code blocks, blockquotes and many more.
Marks can be applied to specific parts of a node. That’s the case for bold, italic or striked text. Links are marks, too.
The Node Schema
Content
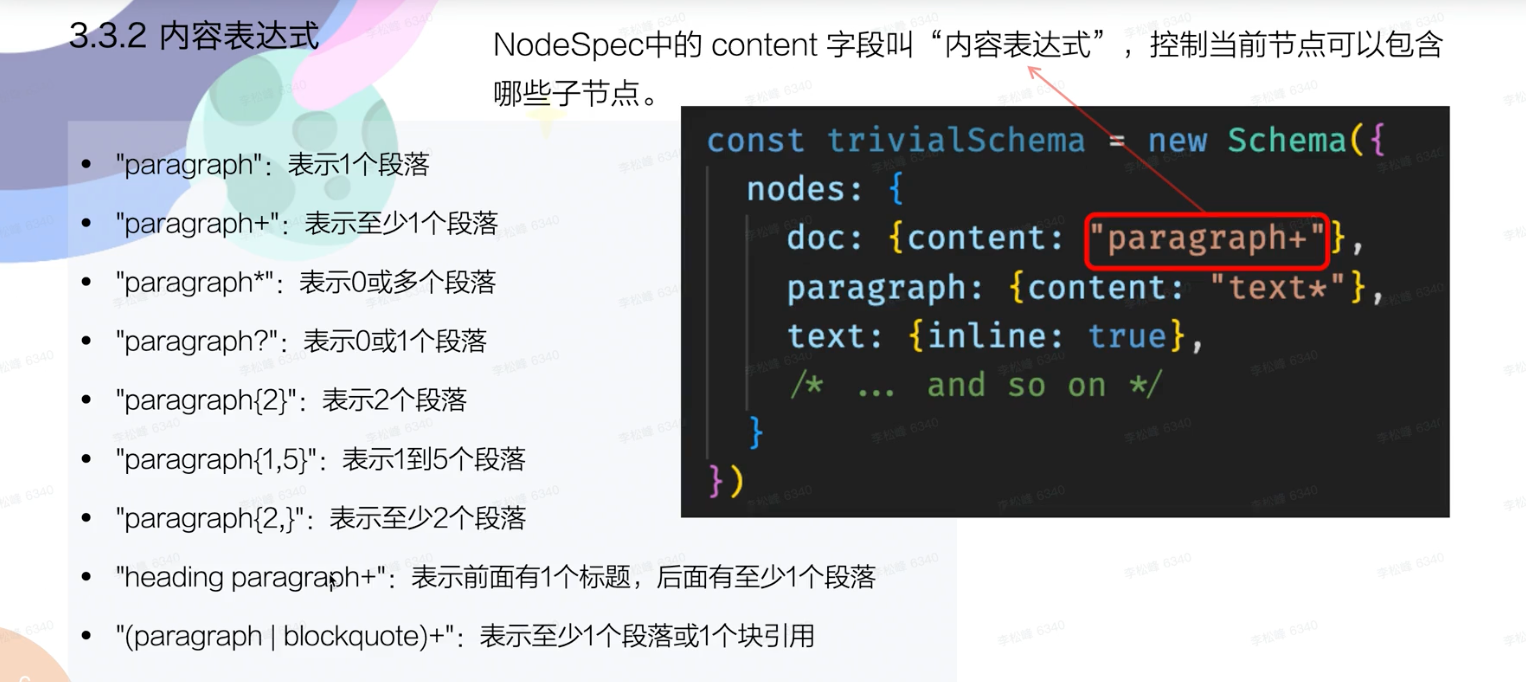
The content attribute defines exactly what kind of content the node can have. ProseMirror is really strict with that. That means, content which doesn’t fit the schema is thrown away. It expects a name or group as a string. Here are a few examples:
content 属性定义了哪些节点可以嵌套在 node 内. ProseMirror 严格按照 schema 来处理节点的嵌套关系, 不符合 schema 的节点将会被直接擦除. 下面是一些例子:
Node.create({
  // must have one or more blocks
  content: 'block+',

  // must have zero or more blocks
  content: 'block*',

  // allows all kinds of 'inline' content (text or hard breaks)
  content: 'inline*',

  // must not have anything else than 'text'
  content: 'text*',

  // can have one or more paragraphs, or lists (if lists are used)
  content: '(paragraph|list?)+',

  // must have exact one heading at the top, and one or more blocks below
  content: 'heading block+'
})
p>img Bugfix
默认情况下 p 标签下只能放 inilne node, 而 img 默认是 block 元素, 因此复制过来的 img 都丢失了
修复方法就是把 img 定义成 inline node
Custom Node Name as Content
自定义的节点的 name , 可以作为另一个节点的 content 去指定
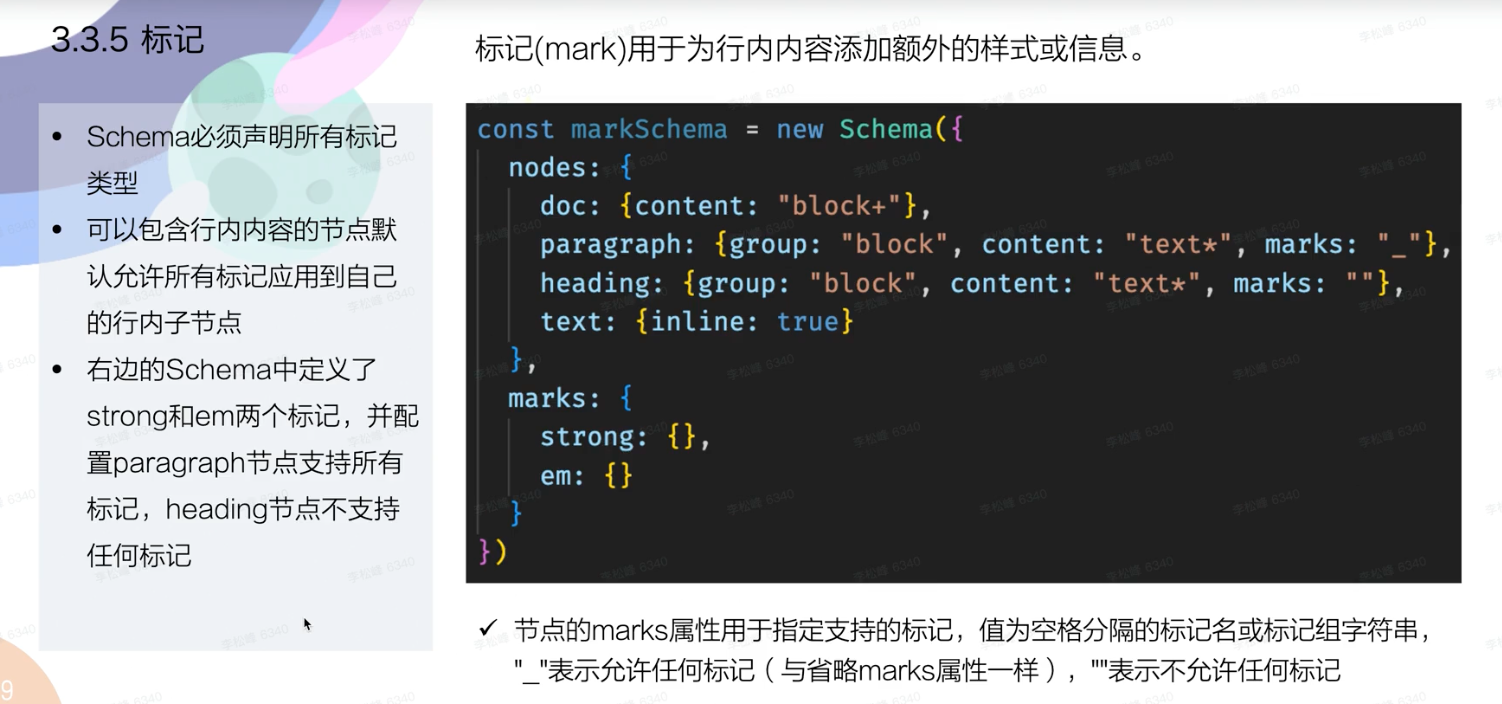
Marks
You can define which marks are allowed inside of a node with the marks setting of the schema. Add a one or more names or groups of marks, allow all or disallow all marks like this:
Node.create({
  // allows only the 'bold' mark
  marks: 'bold',

  // allows only the 'bold' and 'italic' marks
  marks: 'bold italic',

  // allows all marks
  marks: '_',

  // disallows all marks
  marks: '',
})
Group
Add this node to a group of extensions, which can be referred to in the content attribute of the schema.
Node.create({
  // add to 'block' group
  group: 'block',

  // add to 'inline' group
  group: 'inline',

  // add to 'block' and 'list' group
  group: 'block list',
})
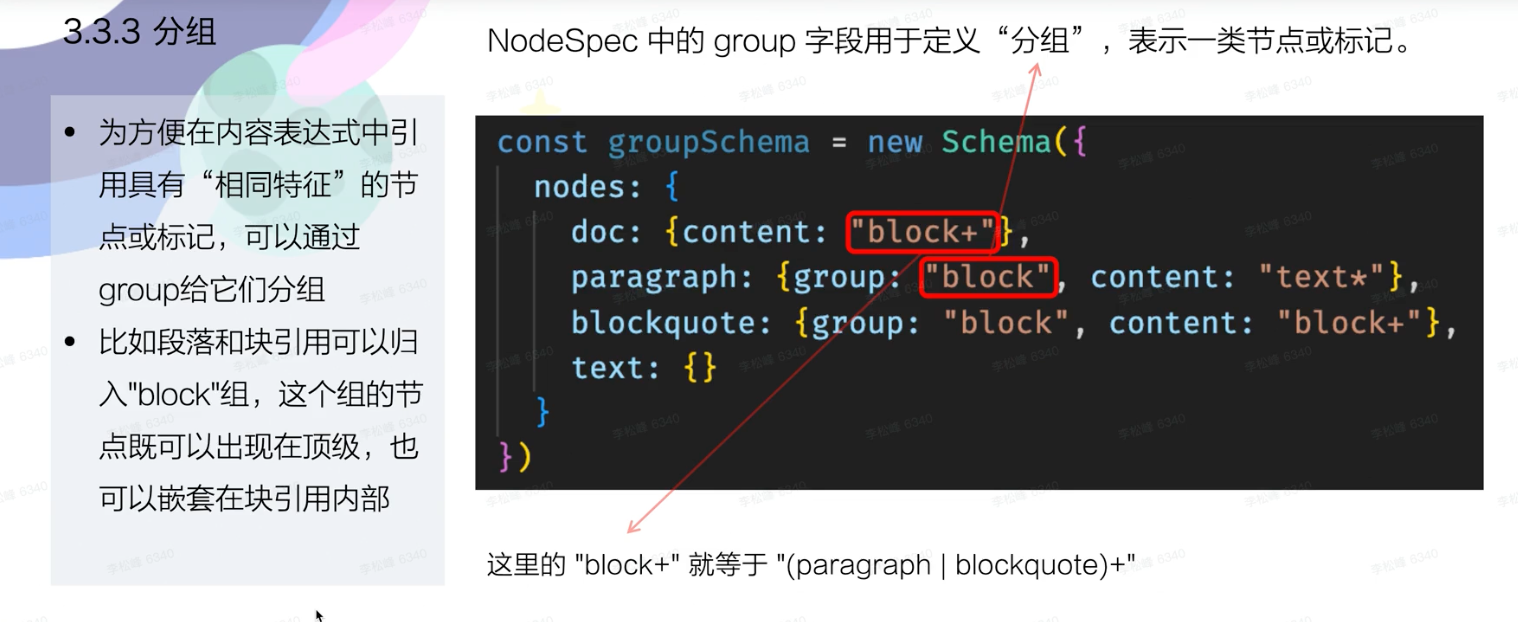
这个 schema 中的 block+
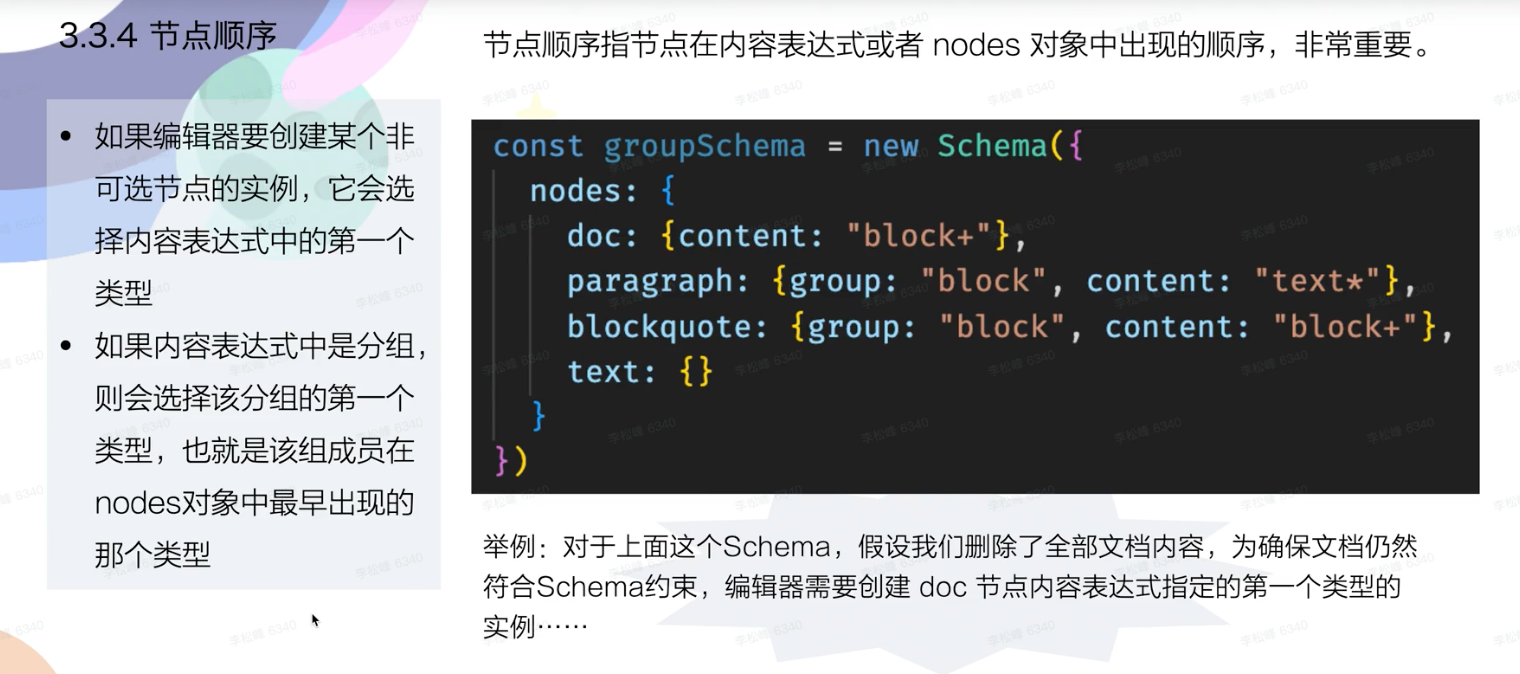
顺序
越早出现, 优先级越高
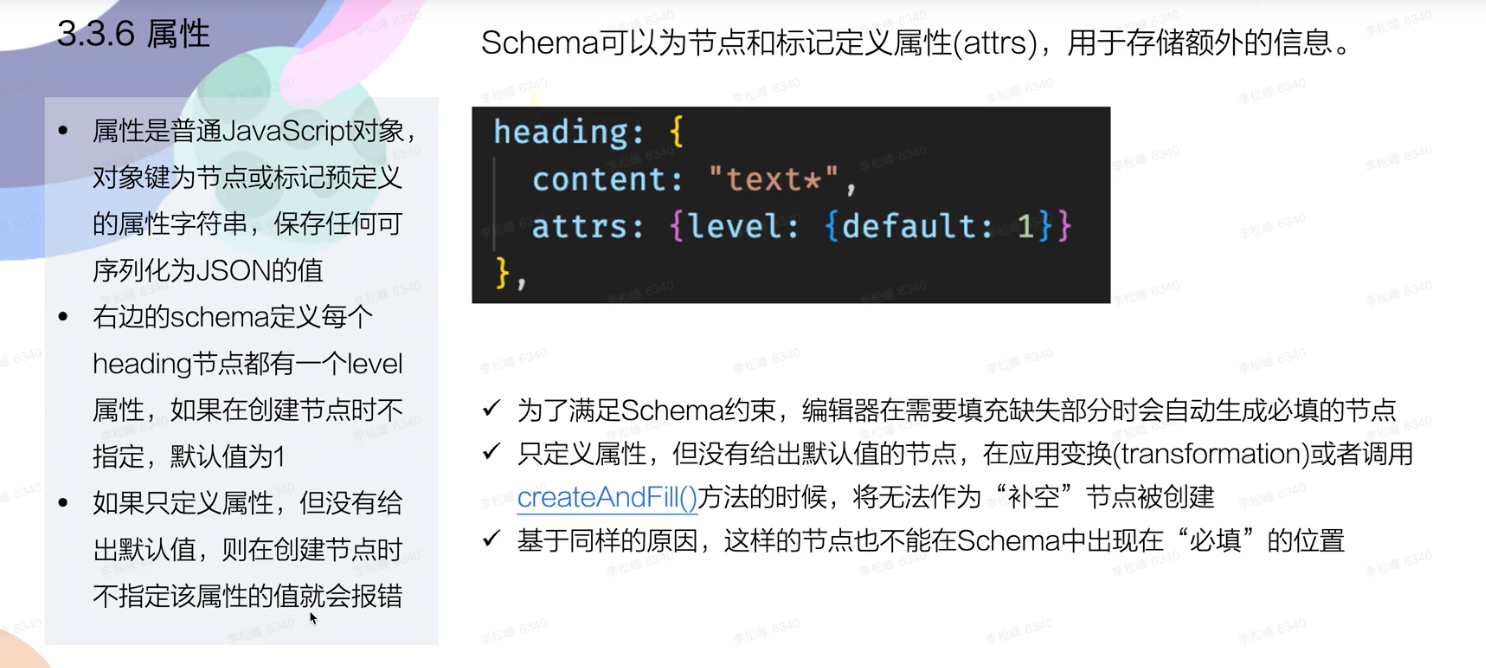
Attrs
Inline
Nodes can be rendered inline, too. When setting inline: true nodes are rendered in line with the text. That’s the case for mentions. The result is more like a mark, but with the functionality of a node. One difference is the resulting JSON document. Multiple marks are applied at once, inline nodes would result in a nested structure.
Node.create({
  // renders nodes in line with the text, for example
  inline: true,
})
For some cases where you want features that aren’t available in marks, for example a node view, try if an inline node would work:
Node.create({
  name: 'customInlineNode',
  group: 'inline',
  inline: true,
  content: 'text*',
})
Atom
Nodes with atom: true aren’t directly editable and should be treated as a single unit. It’s not so likely to use that in a editor context, but this is how it would look like:
Node.create({
  atom: true,
})
One example is the Mention extension, which somehow looks like text, but behaves more like a single unit. As this doesn’t have editable text content, it’s empty when you copy such node. Good news though, you can control that. Here is the example from the Mention extension:
// Used to convert an atom node to plain text
renderText({ node }) {
  return `@${node.attrs.id}`
},
Selectable
Besides the already visible text selection, there is an invisible node selection. If you want to make your nodes selectable, you can configure it like this:
Node.create({
  selectable: true,
})
Draggable
All nodes can be configured to be draggable (by default they aren’t) with this setting:
Node.create({
  draggable: true,
})
Code
Users expect code to behave very differently. For all kind of nodes containing code, you can set code: true to take this into account.
Node.create({
  code: true,
})
Whitespace
Controls way whitespace in this a node is parsed.
Node.create({
  whitespace: 'pre',
})
Defining
Nodes get dropped when their entire content is replaced (for example, when pasting new content) by default. If a node should be kept for such replace operations, configure them as defining.
Typically, that applies to Blockquote, CodeBlock, Heading, and ListItem.
Node.create({
  defining: true,
})
只复制了 listItem 的 content paste 出来的也会是 listitem. 这就是 defining
Isolating
For nodes that should fence the cursor for regular editing operations like backspacing, for example a TableCell, set isolating: true.
Node.create({
  isolating: true,
})
Allow Gap Cursor
The Gapcursor extension registers a new schema attribute to control if gap cursors are allowed everywhere in that node.
Node.create({
  allowGapCursor: false,
})
Table Roles
The Table extension registers a new schema attribute to configure which role an Node has. Allowed values are table, row, cell, and header_cell.
Node.create({
  tableRole: 'cell',
})
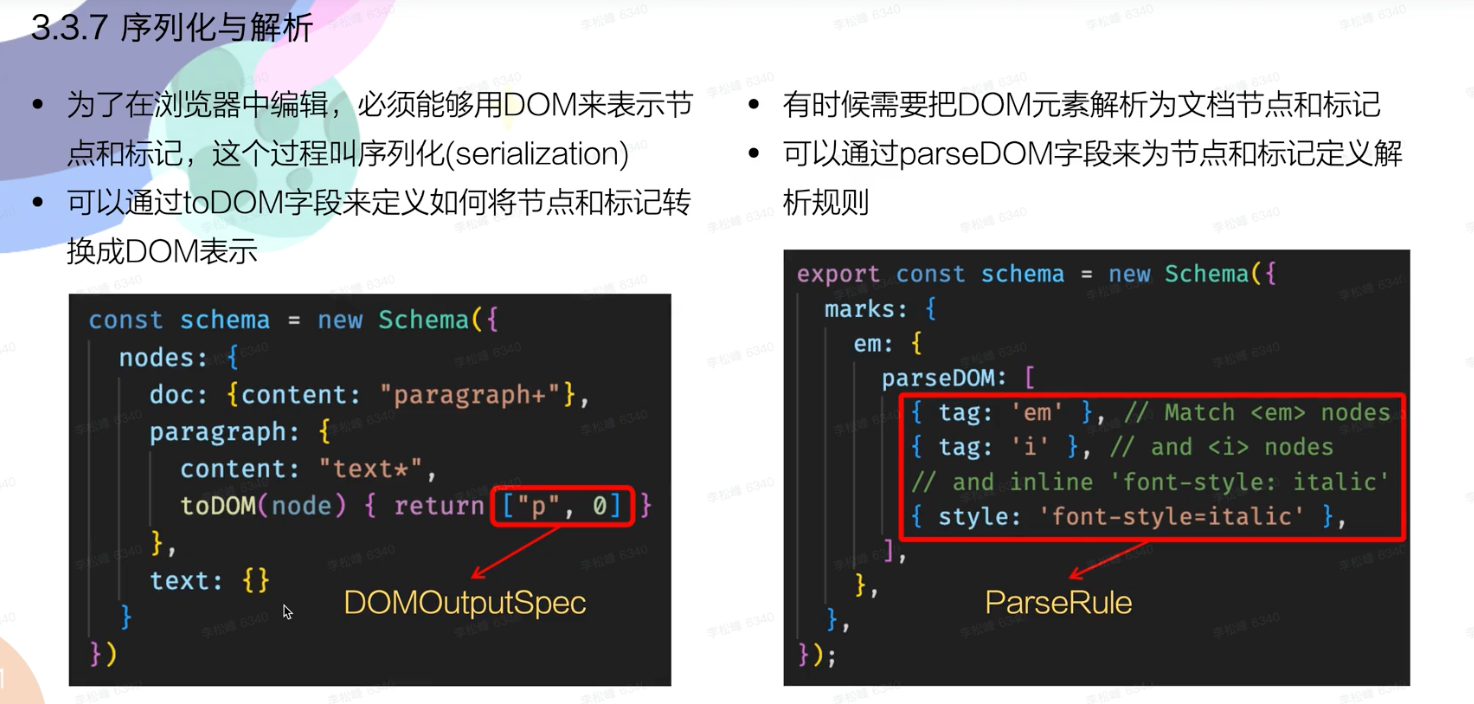
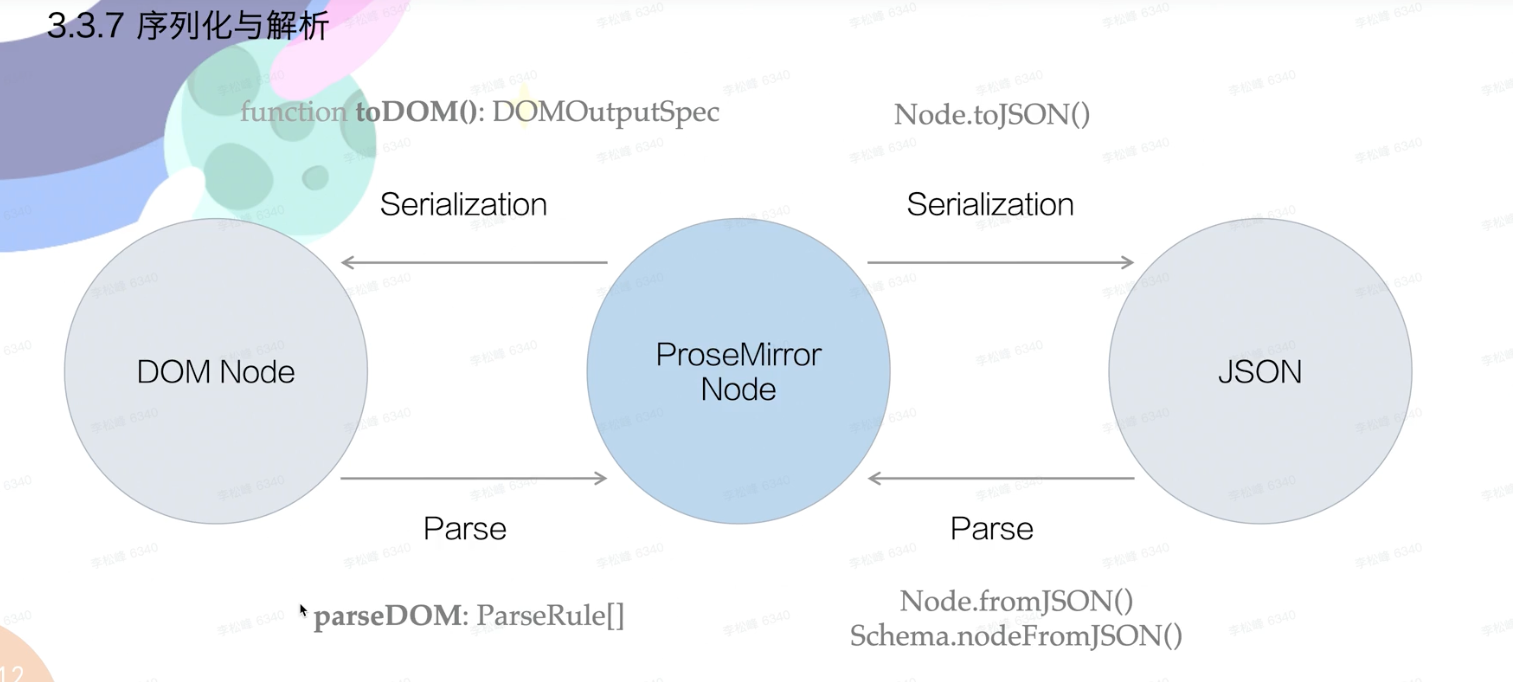
序列化与解析
也可以返回一个 DOM. 参考 template-h2
/**
 * @file system template heading3 extension 图文系统模板标题3
 */

import {mergeAttributes} from '@tiptap/core';
import {sysTemplateH3Wrapper} from '../wrapper/heading3';
import {createTemplateNode} from '../../util/create-template-extension';

const WIDGET_NAME = 'sys-template-h3';

export const SysTemplateH3 = createTemplateNode(WIDGET_NAME, sysTemplateH3Wrapper, {
    parseHTML() {
        return [
            {
                tag: 'div[data-widget]',
                priority: 1001,
                getAttrs(element: unknown) {
                    const match = (element as HTMLElement).getAttribute('data-widget') === WIDGET_NAME;
                    return match && null;
                }
            },
        ];
    },

    renderHTML({HTMLAttributes}) {
        const arrowDOM = document.createElement('span');
        arrowDOM.hasAttribute = () => true;
        arrowDOM.innerText = ' ';
        arrowDOM.setAttribute('style', `
            position: absolute;
            left: 0;
            bottom: -4px;
            width: 0;
            height: 0;
            overflow: hidden;
            font-size: 0;
            border-width: 2px 3px;
            border-style: solid;
            border-color: #1E1F24 #ffffff #ffffff #1E1F24;
        `);

        return [
            'div',
            mergeAttributes(HTMLAttributes, {
                style: [
                    'position: relative;',
                    'margin: 40px 0 16px 20px;',
                    'padding: 0 4px;',
                    'width: fit-content;',
                    'font-size: 16px;',
                    'font-family: FZJunHeiS-R-GB;',
                    'font-weight: 400;',
                    'color: #ffffff;',
                    'background-color: #1E1F24;',
                ].join('')
            }),
            arrowDOM,
            [
                'span',
                mergeAttributes(HTMLAttributes),
                0
            ]
        ];
    },
});
The Mark Schema
Inclusive
If you don’t want the mark to be active when the cursor is at its end, set inclusive to false. For example, that’s how it’s configured for Link marks:
Mark.create({
  inclusive: false,
})
Excludes
By default all nodes can be applied at the same time. With the excludes attribute you can define which marks must not coexist with the mark. For example, the inline code mark excludes any other mark (bold, italic, and all others).
Mark.create({
  // must not coexist with the bold mark
  excludes: 'bold'
  // exclude any other mark
  excludes: '_',
})
Exitable
By default a mark will "trap" the cursor, meaning the cursor can't get out of the mark except by moving the cursor left to right into text without a mark. If this is set to true, the mark will be exitable when the mark is at the end of a node. This is handy for example using code marks.
Mark.create({
  // make this mark exitable - default is false
  exitable: true,
})
Group
Add this mark to a group of extensions, which can be referred to in the content attribute of the schema.
Mark.create({
  // add this mark to the 'basic' group
  group: 'basic',
  // add this mark to the 'basic' and the 'foobar' group
  group: 'basic foobar',
})
Code
Users expect code to behave very differently. For all kind of marks containing code, you can set code: true to take this into account.
Mark.create({
  code: true,
})
Spanning
By default marks can span multiple nodes when rendered as HTML. Set spanning: false to indicate that a mark must not span multiple nodes.
Mark.create({
  spanning: false,
})
Get The Underlying ProseMirror Schema
There are a few use cases where you need to work with the underlying schema. You’ll need that if you’re using the Tiptap collaborative text editing features or if you want to manually render your content as HTML.
Option 1: With an Editor
If you need this on the client side and need an editor instance anyway, it’s available through the editor:
import { Editor } from '@tiptap/core'
import Document from '@tiptap/extension-document'
import Paragraph from '@tiptap/extension-paragraph'
import Text from '@tiptap/extension-text'

const editor = new Editor({
  extensions: [
    Document,
    Paragraph,
    Text,
    // add more extensions here
  ])
})

const schema = editor.schema
Option 2: Without an Editor
If you just want to have the schema without initializing an actual editor, you can use the getSchema helper function. It needs an array of available extensions and conveniently generates a ProseMirror schema for you:
import { getSchema } from '@tiptap/core'
import Document from '@tiptap/extension-document'
import Paragraph from '@tiptap/extension-paragraph'
import Text from '@tiptap/extension-text'

const schema = getSchema([
  Document,
  Paragraph,
  Text,
  // add more extensions here
])
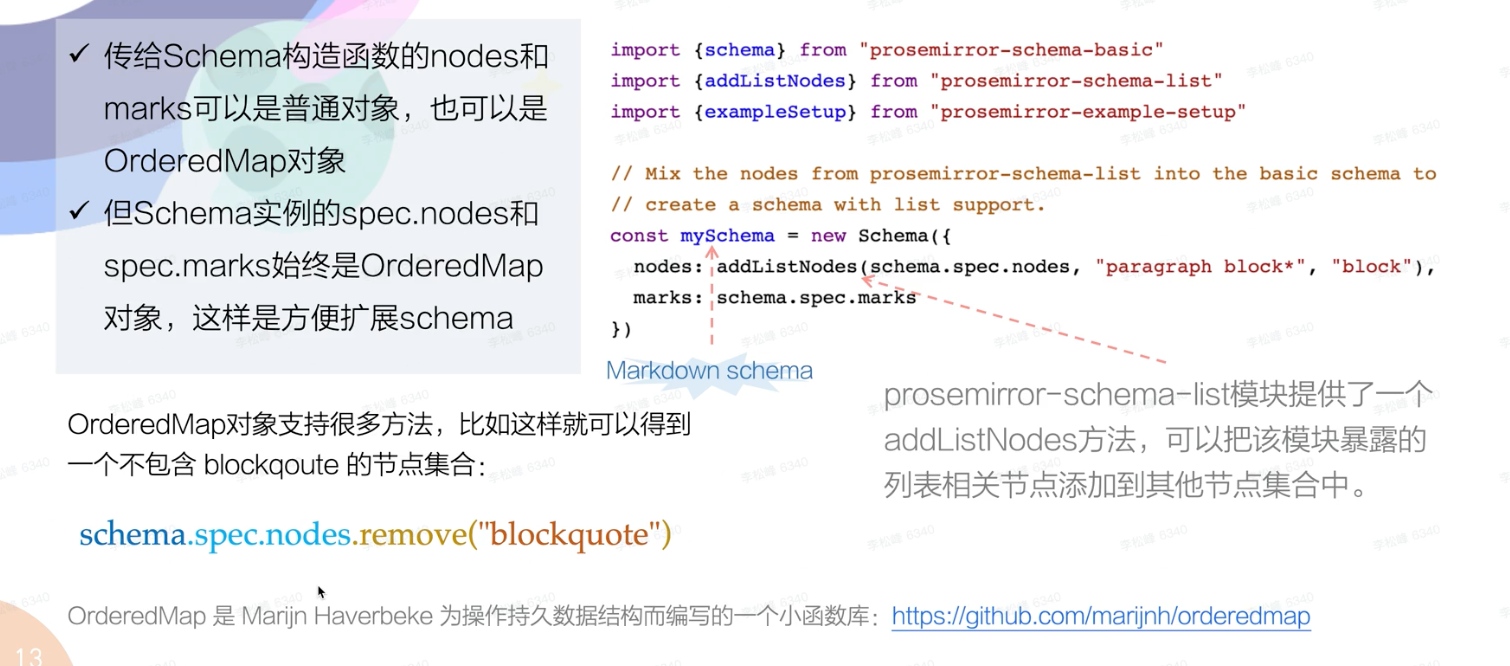
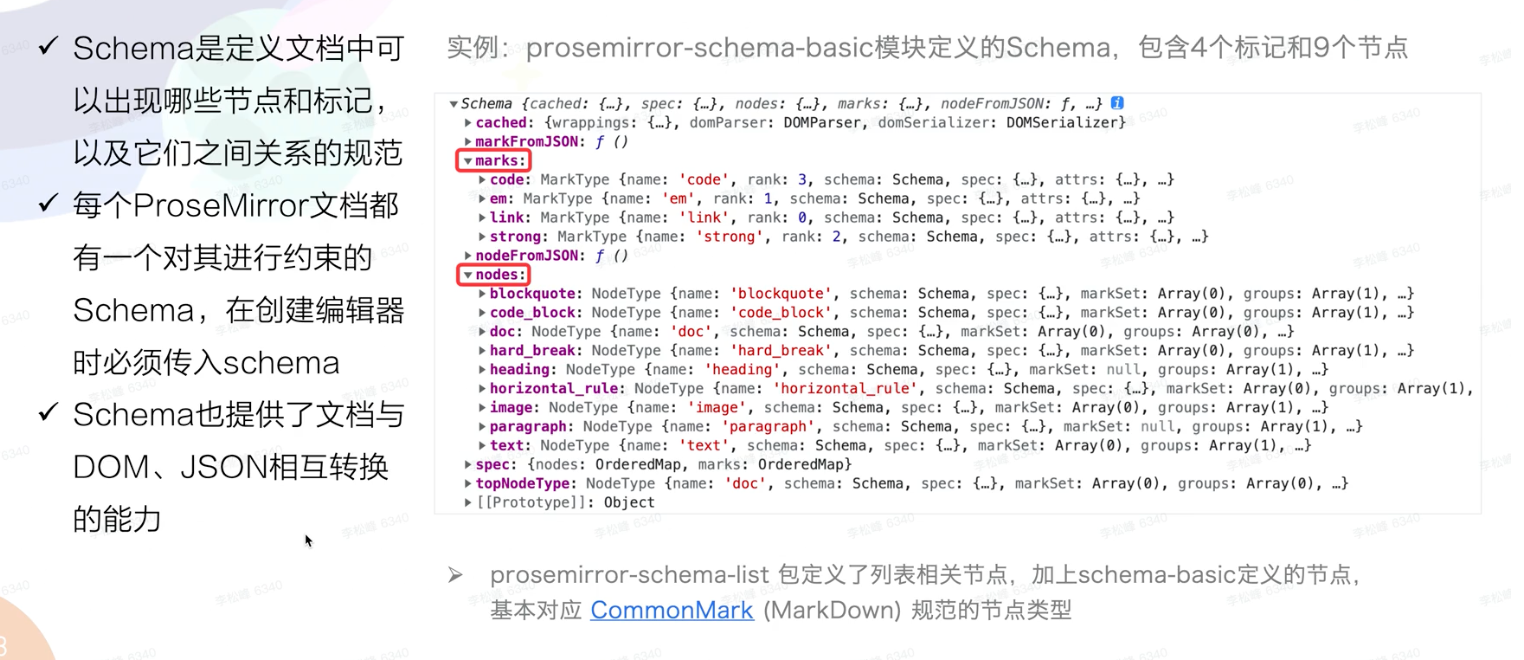
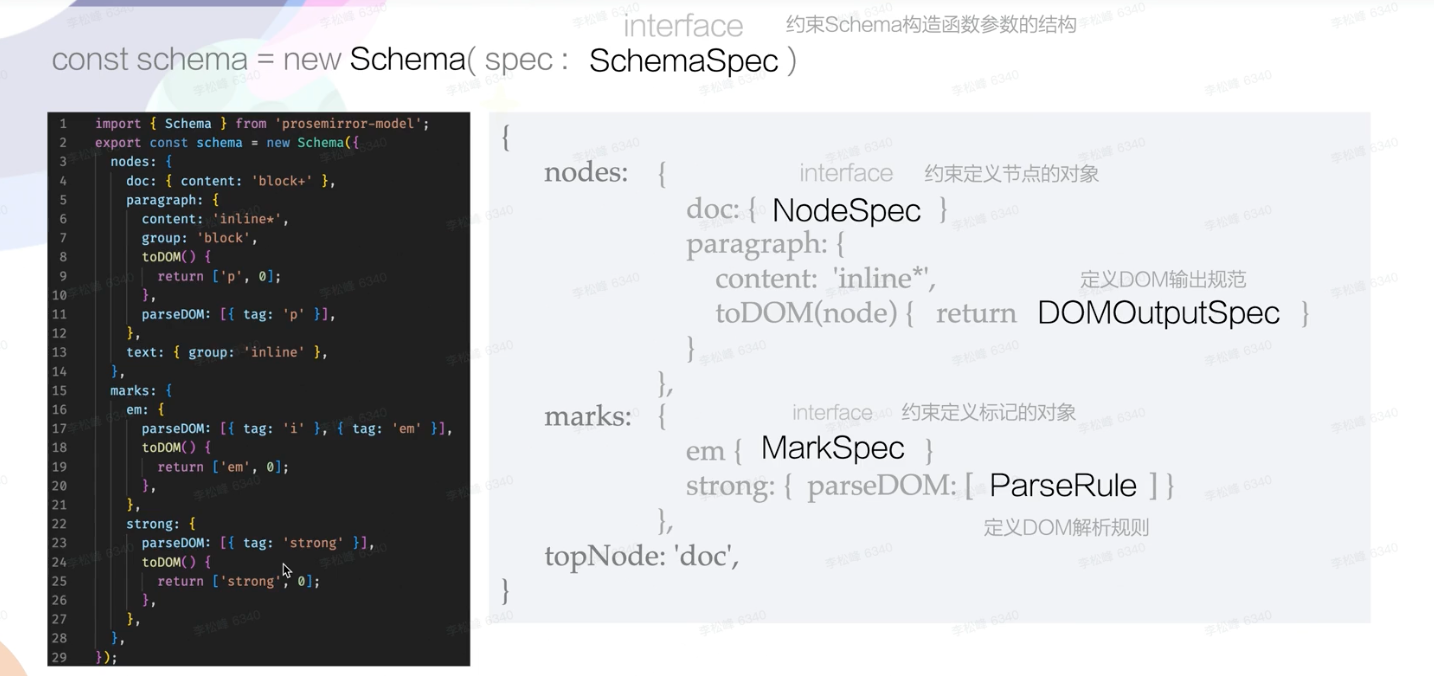
扩展 Schema