dom-selection
https://zhuanlan.zhihu.com/p/44970200
https://zhuanlan.zhihu.com/p/490717610
https://developer.mozilla.org/zh-CN/docs/Web/API/Selection
https://zh.javascript.info/selection-range#shi-bu-ke-xuan
In this chapter we'll cover selection in the document, as well as selection in form fields, such as <input>.
JavaScript can access an existing selection, select/deselect DOM nodes as a whole or partially, remove the selected content from the document, wrap it into a tag, and so on.
You can find some recipes for common tasks at the end of the chapter, in "Summary" section. Maybe that covers your current needs, but you'll get much more if you read the whole text.
The underlying Range and Selection objects are easy to grasp, and then you'll need no recipes to make them do what you want.
Range
The basic concept of selection is Range, that is essentially(本质上、本质的) a pair of "boundary points": range start and range end.
A Range object is created without parameters:
let range = new Range();
Then we can set the selection boundaries using range.setStart(node, offset) and range.setEnd(node, offset).
As you might guess, further we'll use the Range objects for selection, but first let's create few such objects.
Selecting the Text Partially
The interesting thing is that the first argument node in both methods can be either a text node or an element node, and the meaning of the second argument depends on that.
If node is a text node, then offset must be the position in its text.
For example, given the element <p>Hello</p>, we can create the range containing the letters "ll" as follows:
<p id="p">Hello</p>
<script>
  let range = new Range();
  range.setStart(p.firstChild, 2);
  range.setEnd(p.firstChild, 4);

  // toString of a range returns its content as text
  console.log(range); // ll
</script>
Here we take the first child of <p> (that's the text node) and specify the text positions inside it:
Selecting Element Nodes
Alternatively, if node is an element node, then offset must be the child number.
That's handy for making ranges that contain nodes as a whole, not stop somewhere inside their text.
For example, we have a more complex document fragment:
<p id="p">Example: <i>italic</i> and <b>bold</b></p>
Here's its DOM structure with both element and text nodes:
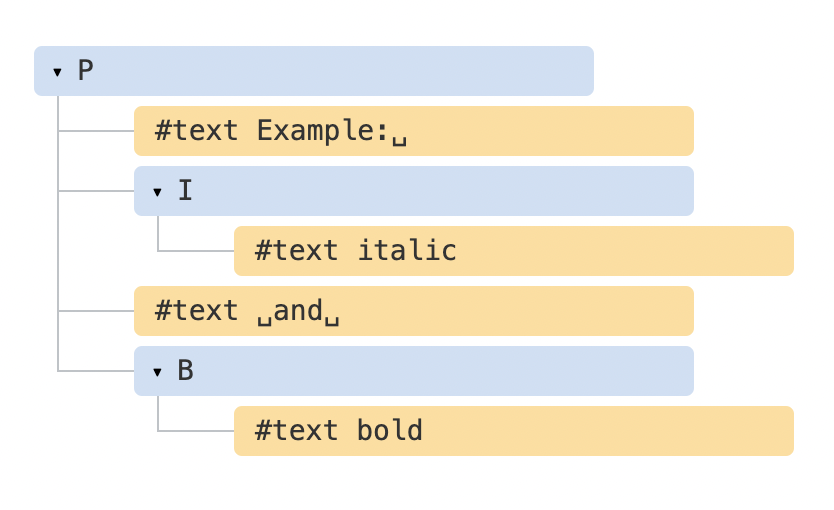
Let's make a range for "Example: <i>italic</i>".
As we can see, this phrase consists of exactly two children of <p>, with indexes 0 and 1:
- The starting point has
<p>as the parentnode, and0as the offset. So we can set it asrange.setStart(p, 0). - The ending point also has
<p>as the parentnode, but2as the offset (it specifies the range up to, but not includingoffset). So we can set it asrange.setEnd(p, 2).
E.g. selecting in the same <p> from offset 1 to 4 gives us the range <i>italic</i> and <b>bold</b>:
Starting and Ending Nodes Can Be Different
We don't have to use the same node in setStart and setEnd. A range may span across many unrelated nodes. It's only important that the end is after the start in the document.
Selecting a Bigger Fragment
Let's make a bigger selection in our example, like this:
We already know how to do that. We just need to set the start and the end as a relative offset in text nodes.
We need to create a range, that:
- starts from position 2 in
<p>first child (taking all but two first letters of "Example: ") - ends at the position 3 in
<b>first child (taking first three letters of "bold", but no more):
<p id="p">Example: <i>italic</i> and <b>bold</b></p>

<script>
  let range = new Range();

  range.setStart(p.firstChild, 2);
  range.setEnd(p.querySelector('b').firstChild, 3);

  console.log(range); // ample: italic and bol

  // use this range for selection (explained later)
  window.getSelection().addRange(range);
</script>
Selecting Nodes
If we’d like to take nodes as a whole, we can pass elements in setStart/setEnd. Otherwise, we can work on the text level.
Range Properties
The range object that we created in the example above has following properties:
startContainer,startOffset-- node and offset of the start,- in the example above: first text node inside
<p>and2.
- in the example above: first text node inside
endContainer,endOffset-- node and offset of the end,- in the example above: first text node inside
<b>and3.
- in the example above: first text node inside
collapsed-- boolean,trueif the range starts and ends on the same point (so there's no content inside the range),- in the example above:
false
- in the example above:
commonAncestorContainer-- the nearest common ancestor of all nodes within the range,- in the example above:
<p>
- in the example above:
Range Selection Methods
There are many convenient methods to manipulate ranges.
We've already seen setStart and setEnd, here are other similar methods.
Set range start:
setStart(node, offset)set start at: positionoffsetinnodesetStartBefore(node)set start at: right beforenodesetStartAfter(node)set start at: right afternode
Set range end (similar methods):
setEnd(node, offset)set end at: positionoffsetinnodesetEndBefore(node)set end at: right beforenodesetEndAfter(node)set end at: right afternode
Technically, setStart/setEnd can do anything, but more methods provide more convenience.
In all these methods, node can be both a text or element node:
- for text nodes
offsetskips that many of characters - while for element nodes that many child nodes.
Even more methods to create ranges:
selectNode(node)set range to select the wholenodeselectNodeContents(node)set range to select the wholenodecontentscollapse(toStart)iftoStart=trueset end=start, otherwise set start=end, thus collapsing the rangecloneRange()creates a new range with the same start/end
Range Editing Methods
Once the range is created, we can manipulate its content using these methods:
deleteContents()-- remove range content from the documentextractContents()-- remove range content from the document and return as DocumentFragmentcloneContents()-- clone range content and return as DocumentFragmentinsertNode(node)-- insertnodeinto the document at the beginning of the rangesurroundContents(node)-- wrapnodearound range content. For this to work, the range must contain both opening and closing tags for all elements inside it: no partial ranges like<i>abc.
With these methods we can do basically anything with selected nodes.
Here's the test stand to see them in action:
There also exist methods to compare ranges, but these are rarely used. When you need them, please refer to the spec or MDN manual.
Selection
Range is a generic object for managing selection ranges. Although, creating a Range doesn't mean that we see a selection on screen.
We may create Range objects, pass them around -- they do not visually select anything on their own.
The document selection is represented by Selection object, that can be obtained as window.getSelection() or document.getSelection(). A selection may include zero or more ranges. At least, the Selection API specification says so. In practice though, only Firefox allows to select multiple ranges in the document by using key:Ctrl+click (key:Cmd+click for Mac).
Here's a screenshot of a selection with 3 ranges, made in Firefox:
Other browsers support at maximum 1 range. As we'll see, some of Selection methods imply that there may be many ranges, but again, in all browsers except Firefox, there's at maximum 1.
Here's a small demo that shows the current selection (select something and click) as text:
Selection Properties
As said, a selection may in theory contain multiple ranges. We can get these range objects using the method:
getRangeAt(i)-- get i-th range, starting from0. In all browsers except Firefox, only0is used.
Also, there exist properties that often provide better convenience.
Similar to a range, a selection object has a start, called "anchor", and the end, called "focus".
The main selection properties are:
anchorNode-- the node where the selection starts,anchorOffset-- the offset inanchorNodewhere the selection starts,focusNode-- the node where the selection ends,focusOffset-- the offset infocusNodewhere the selection ends,isCollapsed--trueif selection selects nothing (empty range), or doesn't exist.rangeCount-- count of ranges in the selection, maximum1in all browsers except Firefox.
Selection end/start Vs Range
There's an important differences of a selection anchor/focus compared with a Range start/end.
As we know, Range objects always have their start before the end.
For selections, that's not always the case.
Selecting something with a mouse can be done in both directions: either "left-to-right" or "right-to-left".
In other words, when the mouse button is pressed, and then it moves forward in the document, then its end (focus) will be after its start (anchor).
E.g. if the user starts selecting with mouse and goes from "Example" to "italic":

...But the same selection could be done backwards: starting from "italic" to "Example" (backward direction), then its end (focus) will be before the start (anchor):

Selection Events
There are events on to keep track of selection:
elem.onselectstart-- when a selection starts specifically on elementelem(or inside it). For instance, when the user presses the mouse button on it and starts to move the pointer.- Preventing the default action cancels the selection start. So starting a selection from this element becomes impossible, but the element is still selectable. The visitor just needs to start the selection from elsewhere.
document.onselectionchange-- whenever a selection changes or starts.- Please note: this handler can be set only on
document, it tracks all selections in it.
- Please note: this handler can be set only on
Selection Tracking Demo
Here's a small demo. It tracks the current selection on the document and shows its boundaries:
<p id="p">Select me: <i>italic</i> and <b>bold</b></p>

From <input id="from" disabled> – To <input id="to" disabled>
<script>
  document.onselectionchange = function() {
    let selection = document.getSelection();

    let {anchorNode, anchorOffset, focusNode, focusOffset} = selection;

    // anchorNode and focusNode are text nodes usually
    from.value = `${anchorNode?.data}, offset ${anchorOffset}`;
    to.value = `${focusNode?.data}, offset ${focusOffset}`;
  };
</script>
Selection Copying Demo
There are two approaches to copying the selected content:
- We can use
document.getSelection().toString()to get it as text. - Otherwise, to copy the full DOM, e.g. if we need to keep formatting, we can get the underlying ranges with
getRangesAt(...). ARangeobject, in turn, hascloneContents()method that clones its content and returns asDocumentFragmentobject, that we can insert elsewhere.
Here's the demo of copying the selected content both as text and as DOM nodes:
<p id="p">Select me: <i>italic</i> and <b>bold</b></p>

Cloned: <span id="cloned"></span>
<br>
As text: <span id="astext"></span>

<script>
  document.onselectionchange = function() {
    let selection = document.getSelection();

    cloned.innerHTML = astext.innerHTML = "";

    // Clone DOM nodes from ranges (we support multiselect here)
    for (let i = 0; i < selection.rangeCount; i++) {
      cloned.append(selection.getRangeAt(i).cloneContents());
    }

    // Get as text
    astext.innerHTML += selection;
  };
</script>
Selection Methods
We can work with the selection by adding/removing ranges:
getRangeAt(i)-- get i-th range, starting from0. In all browsers except Firefox, only0is used.addRange(range)-- addrangeto selection. All browsers except Firefox ignore the call, if the selection already has an associated range.removeRange(range)-- removerangefrom the selection.removeAllRanges()-- remove all ranges.empty()-- alias toremoveAllRanges.
There are also convenience methods to manipulate the selection range directly, without intermediate Range calls:
collapse(node, offset)-- replace selected range with a new one that starts and ends at the givennode, at positionoffset.setPosition(node, offset)-- alias tocollapse.collapseToStart()- collapse (replace with an empty range) to selection start,collapseToEnd()- collapse to selection end,extend(node, offset)- move focus of the selection to the givennode, positionoffset,setBaseAndExtent(anchorNode, anchorOffset, focusNode, focusOffset)- replace selection range with the given startanchorNode/anchorOffsetand endfocusNode/focusOffset. All content in-between them is selected.selectAllChildren(node)-- select all children of thenode.deleteFromDocument()-- remove selected content from the document.containsNode(node, allowPartialContainment = false)-- checks whether the selection containsnode(partially if the second argument istrue)
For most tasks these methods are just fine, there's no need to access the underlying Range object.
For example, selecting the whole contents of the paragraph <p>:
<p id="p">Select me: <i>italic</i> and <b>bold</b></p>

<script>
  // select from 0th child of <p> to the last child
  document.getSelection().setBaseAndExtent(p, 0, p, p.childNodes.length);
</script>
The same thing using ranges:
<p id="p">Select me: <i>italic</i> and <b>bold</b></p>

<script>
  let range = new Range();
  range.selectNodeContents(p); // or selectNode(p) to select the <p> tag too

  document.getSelection().removeAllRanges(); // clear existing selection if any
  document.getSelection().addRange(range);
</script>
To Select Something, Remove the Existing Selection First
If a document selection already exists, empty it first with removeAllRanges(). And then add ranges. Otherwise, all browsers except Firefox ignore new ranges.
The exception is some selection methods, that replace the existing selection, such as setBaseAndExtent.
Selection in Form Controls
Form elements, such as input and textarea provide special API for selection, without Selection or Range objects. As an input value is a pure text, not HTML, there's no need for such objects, everything's much simpler.
Properties:
input.selectionStart-- position of selection start (writeable),input.selectionEnd-- position of selection end (writeable),input.selectionDirection-- selection direction, one of: "forward", "backward" or "none" (if e.g. selected with a double mouse click),
Events:
input.onselect-- triggers when something is selected.
Methods:
-
input.select()-- selects everything in the text control (can betextareainstead ofinput), -
input.setSelectionRange(start, end, [direction])-- change the selection to span from positionstarttillend, in the given direction (optional). -
input.setRangeText(replacement, [start], [end], [selectionMode])-- replace a range of text with the new text.Optional arguments
startandend, if provided, set the range start and end, otherwise user selection is used.The last argument,
selectionMode, determines how the selection will be set after the text has been replaced. The possible values are:"select"-- the newly inserted text will be selected."start"-- the selection range collapses just before the inserted text (the cursor will be immediately before it)."end"-- the selection range collapses just after the inserted text (the cursor will be right after it)."preserve"-- attempts to preserve the selection. This is the default.
Now let's see these methods in action.
Example: Tracking Selection
For example, this code uses onselect event to track selection:
<textarea id="area" style="width:80%;height:60px">
Selecting in this text updates values below.
</textarea>
<br>
From <input id="from" disabled> – To <input id="to" disabled>

<script>
  area.onselect = function() {
    from.value = area.selectionStart;
    to.value = area.selectionEnd;
  };
</script>
Please note:
onselecttriggers when something is selected, but not when the selection is removed.document.onselectionchangeevent should not trigger for selections inside a form control, according to the spec, as it's not related todocumentselection and ranges. Some browsers generate it, but we shouldn't rely on it.
Example: Moving Cursor
We can change selectionStart and selectionEnd, that sets the selection.
An important edge case is when selectionStart and selectionEnd equal each other. Then it's exactly the cursor position. Or, to rephrase, when nothing is selected, the selection is collapsed at the cursor position.
So, by setting selectionStart and selectionEnd to the same value, we move the cursor.
For example:
<textarea id="area" style="width:80%;height:60px">
Focus on me, the cursor will be at position 10.
</textarea>

<script>
  area.onfocus = () => {
    // zero delay setTimeout to run after browser "focus" action finishes
    setTimeout(() => {
      // we can set any selection
      // if start=end, the cursor is exactly at that place
      area.selectionStart = area.selectionEnd = 10;
    });
  };
</script>
Example: Modifying Selection
To modify the content of the selection, we can use input.setRangeText() method. Of course, we can read selectionStart/End and, with the knowledge of the selection, change the corresponding substring of value, but setRangeText is more powerful and often more convenient.
That's a somewhat complex method. In its simplest one-argument form it replaces the user selected range and removes the selection.
For example, here the user selection will be wrapped by *...*:
<input id="input" style="width:200px" value="Select here and click the button">
<button id="button">Wrap selection in stars *...*</button>

<script>
button.onclick = () => {
  if (input.selectionStart == input.selectionEnd) {
    return; // nothing is selected
  }

  let selected = input.value.slice(input.selectionStart, input.selectionEnd);
  input.setRangeText(`*${selected}*`);
};
</script>
With more arguments, we can set range start and end.
In this example we find "THIS" in the input text, replace it and keep the replacement selected:
<input id="input" style="width:200px" value="Replace THIS in text">
<button id="button">Replace THIS</button>

<script>
button.onclick = () => {
  let pos = input.value.indexOf("THIS");
  if (pos >= 0) {
    input.setRangeText("*THIS*", pos, pos + 4, "select");
    input.focus(); // focus to make selection visible
  }
};
</script>
Example: Insert at Cursor
If nothing is selected, or we use equal start and end in setRangeText, then the new text is just inserted, nothing is removed.
We can also insert something "at the cursor" using setRangeText.
Here's a button that inserts "HELLO" at the cursor position and puts the cursor immediately after it. If the selection is not empty, then it gets replaced (we can detect it by comparing selectionStart!=selectionEnd and do something else instead):
<input id="input" style="width:200px" value="Text Text Text Text Text">
<button id="button">Insert "HELLO" at cursor</button>

<script>
  button.onclick = () => {
    input.setRangeText("HELLO", input.selectionStart, input.selectionEnd, "end");
    input.focus();
  };
</script>
Making Unselectable
To make something unselectable, there are three ways:
-
Use CSS property
user-select: none.<style> #elem { user-select: none; } </style> <div>Selectable <div id="elem">Unselectable</div> Selectable</div>This doesn't allow the selection to start at
elem. But the user may start the selection elsewhere and includeeleminto it.Then
elemwill become a part ofdocument.getSelection(), so the selection actually happens, but its content is usually ignored in copy-paste. -
Prevent default action in
onselectstartormousedownevents.<div>Selectable <div id="elem">Unselectable</div> Selectable</div> <script> elem.onselectstart = () => false; </script>This prevents starting the selection on
elem, but the visitor may start it at another element, then extend toelem.That's convenient when there's another event handler on the same action that triggers the select (e.g.
mousedown). So we disable the selection to avoid conflict, still allowingelemcontents to be copied. -
We can also clear the selection post-factum after it happens with
document.getSelection().empty(). That's rarely used, as this causes unwanted blinking as the selection appears-disappears.
References
Summary
We covered two different APIs for selections:
- For document:
SelectionandRangeobjects. - For
input,textarea: additional methods and properties.
The second API is very simple, as it works with text.
The most used recipes are probably:
-
Getting the selection:
let selection = document.getSelection(); let cloned = /* element to clone the selected nodes to */; // then apply Range methods to selection.getRangeAt(0) // or, like here, to all ranges to support multi-select for (let i = 0; i < selection.rangeCount; i++) { cloned.append(selection.getRangeAt(i).cloneContents()); } -
Setting the selection:
let selection = document.getSelection();

// directly:
selection.setBaseAndExtent(...from...to...);

// or we can create a range and:
selection.removeAllRanges();
selection.addRange(range);
And finally, about the cursor. The cursor position in editable elements, like <textarea> is always at the start or the end of the selection. We can use it to get cursor position or to move the cursor by setting elem.selectionStart and elem.selectionEnd.
FAQ
根据 Node 获取位置
使用 selection.setPosition(node, offset) 设置 selection 到当前 node 的 offset 处, 然后即可获取该 node 的位置信息
根据位置获取 Node
使用 selection.anchorNode 和 selection.focusNode
但是前提是先聚焦, 貌似没有办法获取当前正在聚焦的节点的兄弟节点, 只能继续通过 dom api 操作
获取当前位置的前一个/后一个 Node
通过 dom api 操作
选中一个 Node
只能通过 range api, selection 的貌似没有找到类似的